Tag: Free Motion Quilting

My Favourite Free Motion Quilting Tools
September 9, 2015
If you’re just starting to free motion quilt with your domestic sewing machine, you may be keen to learn about some tools that can help improve your quilting, and your experience.
This post will go beyond the standard tools such as a darning foot, and talk about a few of my favourite “extras” that make my quilting better.
Supreme Slider
This handy teflon sheet allows your quilt to slide nicely across the bed of your machine. It helps to reduce friction and jerky movements that can lead to uneven stitches. It really does make a difference.
Use it with your extension table, or if you have a drop in sewing table, they make a jumbo version as well.
An important note – while it may be tempting to try to use this while quilting with your walking foot, it doesn’t have a large enough hole for the feed dogs and you will get it caught in the stitching on the underside of your quilt. Don’t ask how I know this.
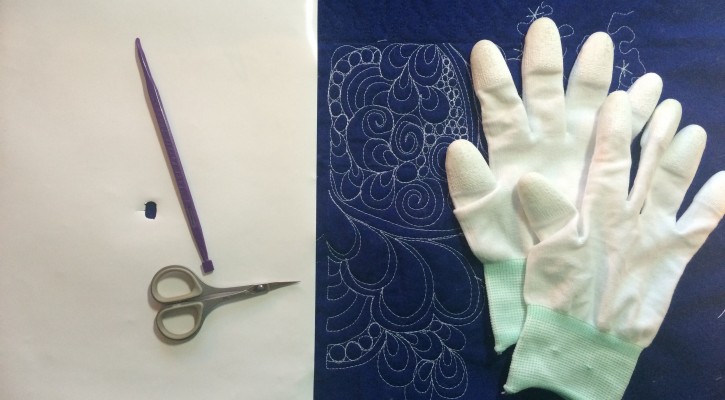
Machingers Gloves
Every different quilter will have an opinion on whether or not it’s worth it to use gloves while quilting. And those that do will have an opinion on the various different kinds of gloves available. There are even “hacks” for cutting off the tips of rubber or gardening gloves.
These are all well and good, but nothing I’ve tried has worked as well as the Machingers Gloves. The give you extra grip without getting in the way, falling off, or otherwise being awkward. They breathe well, so even in the summer, I don’t feel like I’ve got extra sweaty hands.
They say you can do lots of thing with them on. This is mostly true – I am able to bring up the bobbin thread (with the assistance of my Purple Thang) while wearing them. However, I’m not dexterous enough to wear them while sinking thread ends or other more complicated tasks. Fortunately, they are quick and easy to take off and put back on again.
One thing to note – these gloves do wear out. You can wash them, but I had to replace mine after a couple of years when the rubbery tips were starting to wear out. But they’re pretty cheap and worth it.
That Purple Thang
This is one of those “gadgets” you’ve probably seen at some quilt show and wondered “What the heck do I do with it? Why would I need that?” While it’s true that you could probably perform various functions with other tools, the Purple Thang just does them so easily and elegantly.
I keep mine close by when I’m quilting for two main purposes: using the tip to bring up the bobbin thread at the start of a new line of quilting, and using it to open and remove basting safety pins.
Bringing the bobbin thread up when you start quilting will help prevent it from making a tangled mess on the back of your quilt. If you plan to tie off your thread, you will also need to pull up a good length in order to tie a knot.
Because I like using the auto thread cutter on my Janome MC6600P, my bobbin threads are often very short when they come up. The Purple Thang allows me to easily lift it up to grab.
While you’re quilting, you’ll probably need to remove a basting safety pin at some point. Often it’s in an awkward spot that makes it hard to grab to open. Using the tip of the Purple Thang you can push up the point of the pin and lift it out of the pin’s head. You can also hook the tip around the base of the pin to pull it out of the quilt sandwich. After you do this a couple of times it becomes almost second nature.
The Purple Thang also comes in handy if you need to push in bulk while quilting. You could also do this with an awl or seam ripper, but if you accidentally get under the needle while it’s moving, the Purple Thang is plastic and won’t shatter your needle. It keeps your fingers away from the needle too.
Small Curved Tip Scissors
These scissors are perfect for trimming off threads super close to your quilt top, while lowering the risk that you accidentally nick the fabric.
You want a pair that’s a small size so you can easily get it around the sewing machine at any angle to nip those threads. They work well whether you use packing stitches or tie off and sink your thread on starts and stops.
I’m not sure what brand mine are, but they are one of my favourite tools. I’d be lost without them.
Practice Sandwich
While it’s useful to have a small sandwich with backing, batting and top fabric(s) specific to your individual project to test tension, I find it equally useful to have a larger practice sandwich to provide a bigger space for testing your designs.
I buy 2 metres of some dark colour homespun and sandwich it between a metre of my favorite batting (Matilda’s Own 100% cotton), then use contrasting thread in my machine. The larger size gives me plenty of space to test out my design to make sure I have the motion down and it’s working out as expected. It also better replicates the project quilting experience by making me practice managing the bulk of a larger quilt. It can be really easy to quilt a design on a 10″ square piece, but doing it on a 40″ square piece can produce a different experience.
You can use a white marker or chalk to mark a “block” or even make yourself smaller squares to work in.
Once your practice sandwich is filled up, you can cut it up to make lots of things: pot holders, drawer liners, even put the pieces between dishes when moving to prevent breakages.
Last but not least, some groovy tunes
Free motion quilting requires a bit more concentration than just piecing or straight line quilting. So I like to listen to something a little bouncy to get my body moving, without having to think about it too much, like you do with an audiobook, podcast or TV.
I found a fun little gadget that incorporates an iPod player/dock with a lamp. I don’t think they sell them any more, but any music player will work.
My perennial faves are Daft Punk, Beck, Radiohead, La Roux and Underworld.
Don’t forget to get up regularly and take a dance break.
Do you have any favourite tools you use when free motion quilting?


