Low Waste Signature Block
August 7, 2015
I wanted to make a signature block for my Game of Quilts challenge entry (spoilers!!!). I was limited to using the fat quarters provided, so I didn’t have heaps of fabric. I found some other tutorials for signature blocks, but they used the snowball corner method, which wastes a lot of fabric.
I decided to come do strip pieced blocks to use the minimum amount of fabric. The final blocks are trimmed to the perfect size.
What you’ll need
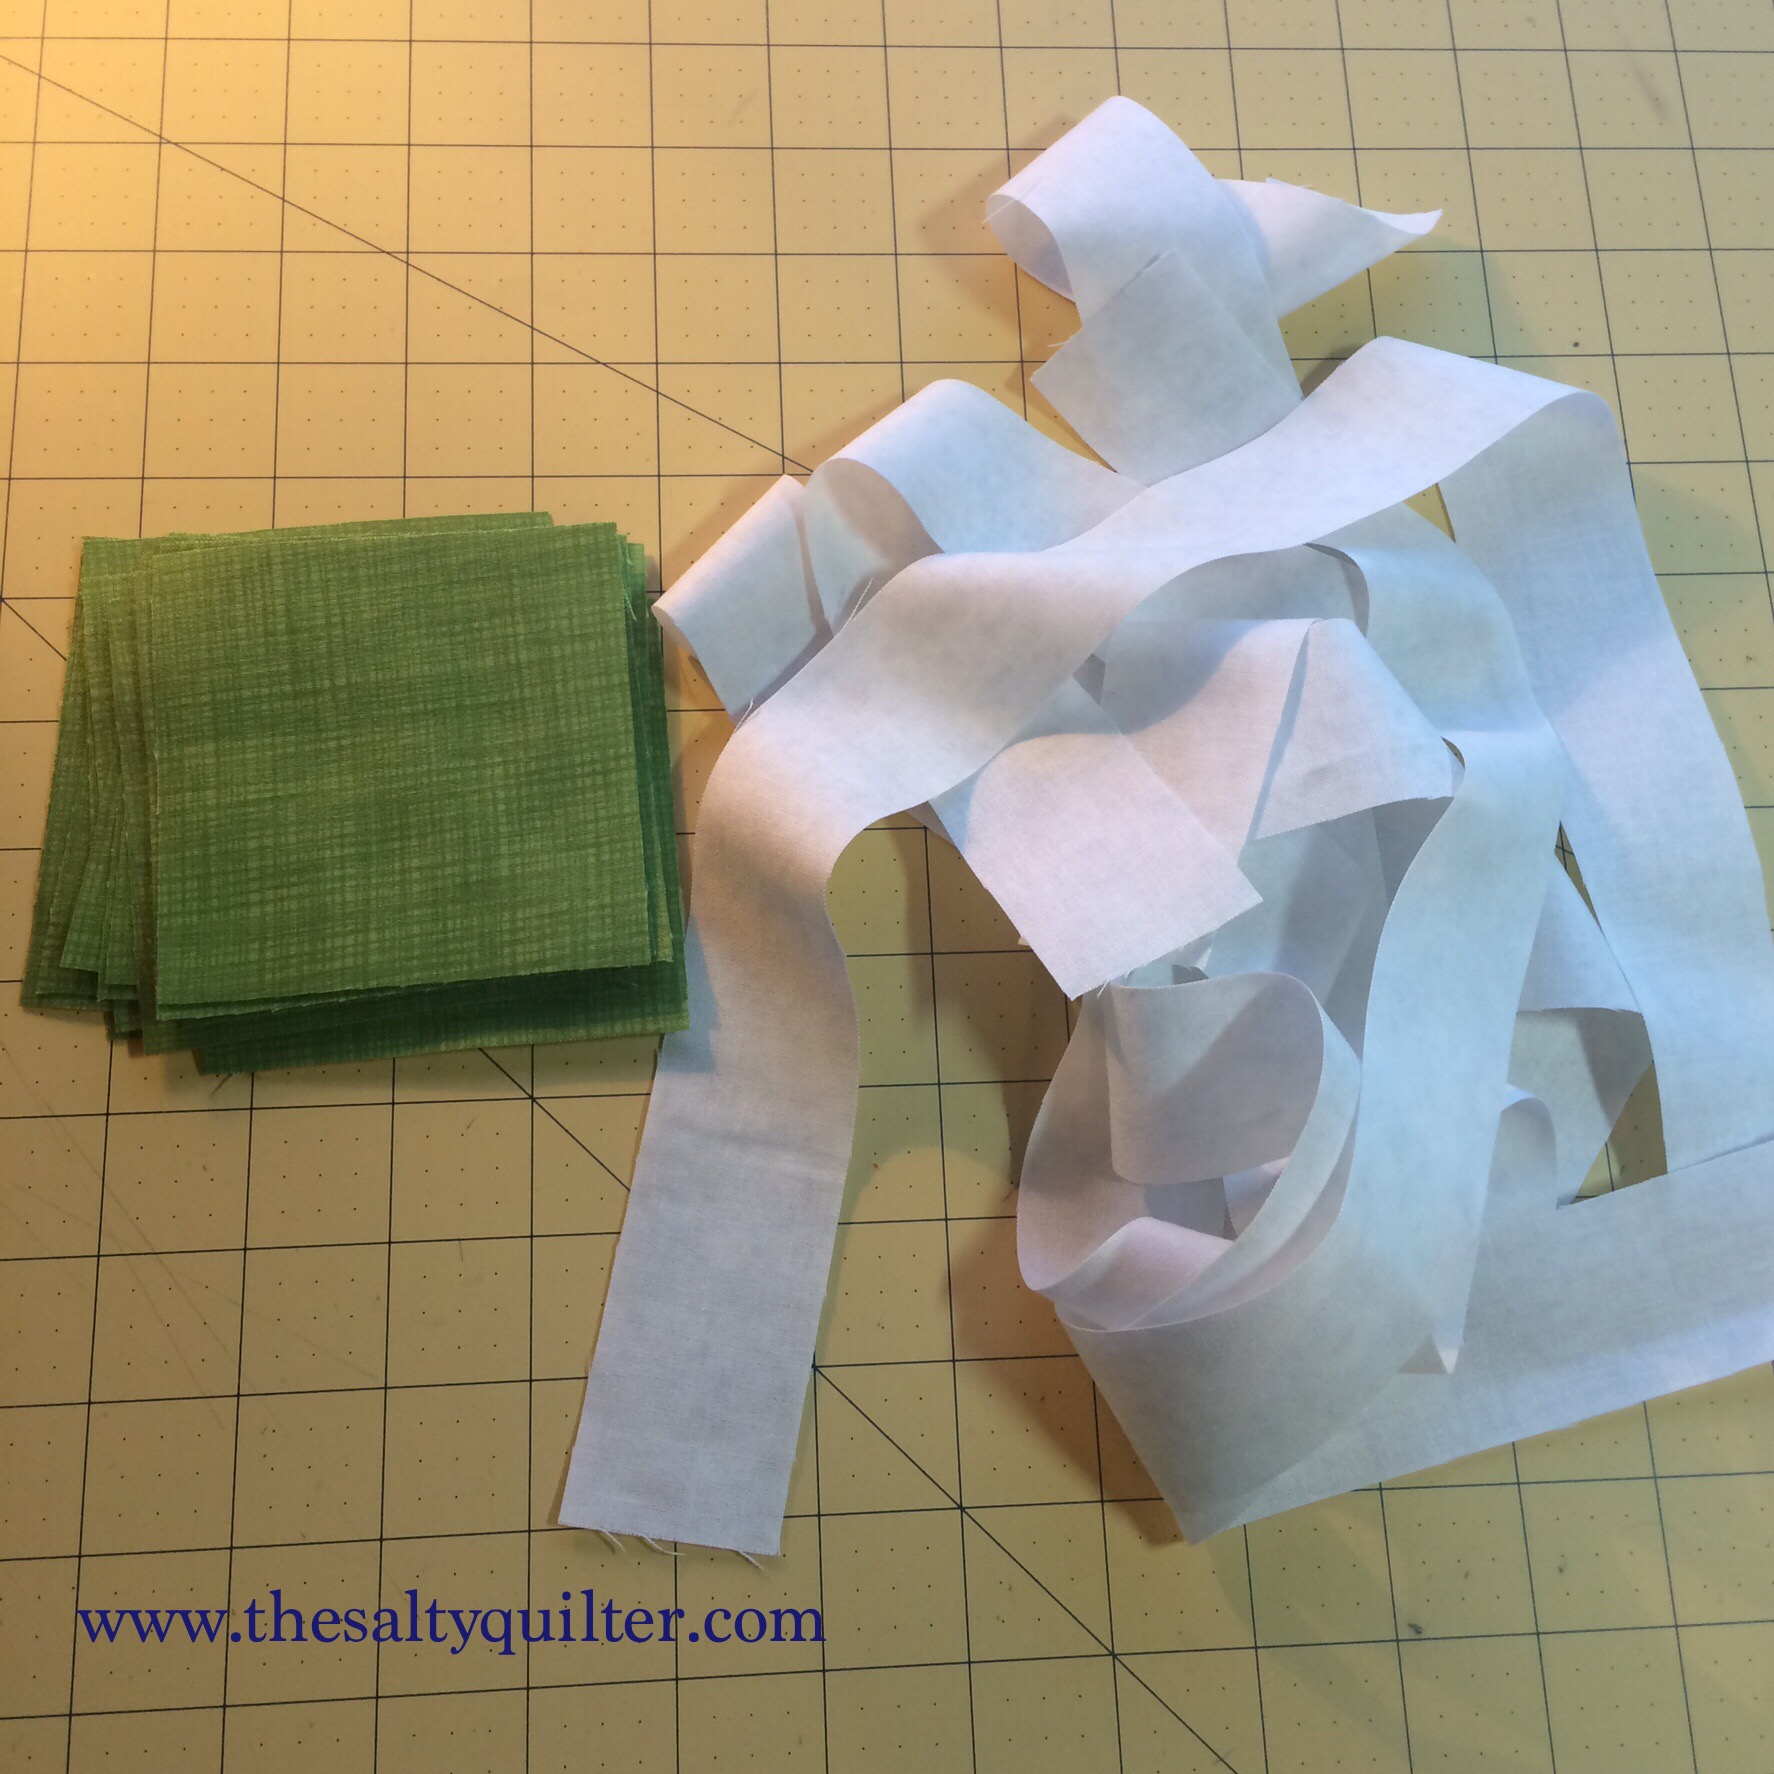
- 1 1/2″ strips of light colour fabric for the centre signature stripe
- Squares of the background fabric(s) the size of your unfinished block – the number needed for the desired layout, plus a couple of extras for signing mistakes
We’ll be working with bias edges, so I recommend using starch or Best Press on the fabric before cutting.
Method
Step 1:
I cut my background fabric squares at 3 1/2″ – the size of my final unsewn (unfinished) blocks.
Slice the squares diagonally. Stack up the two sides of triangles in equal piles – they don’t need to be kept in order.
Step 2:
Take your stacks and strips to your sewing machine.
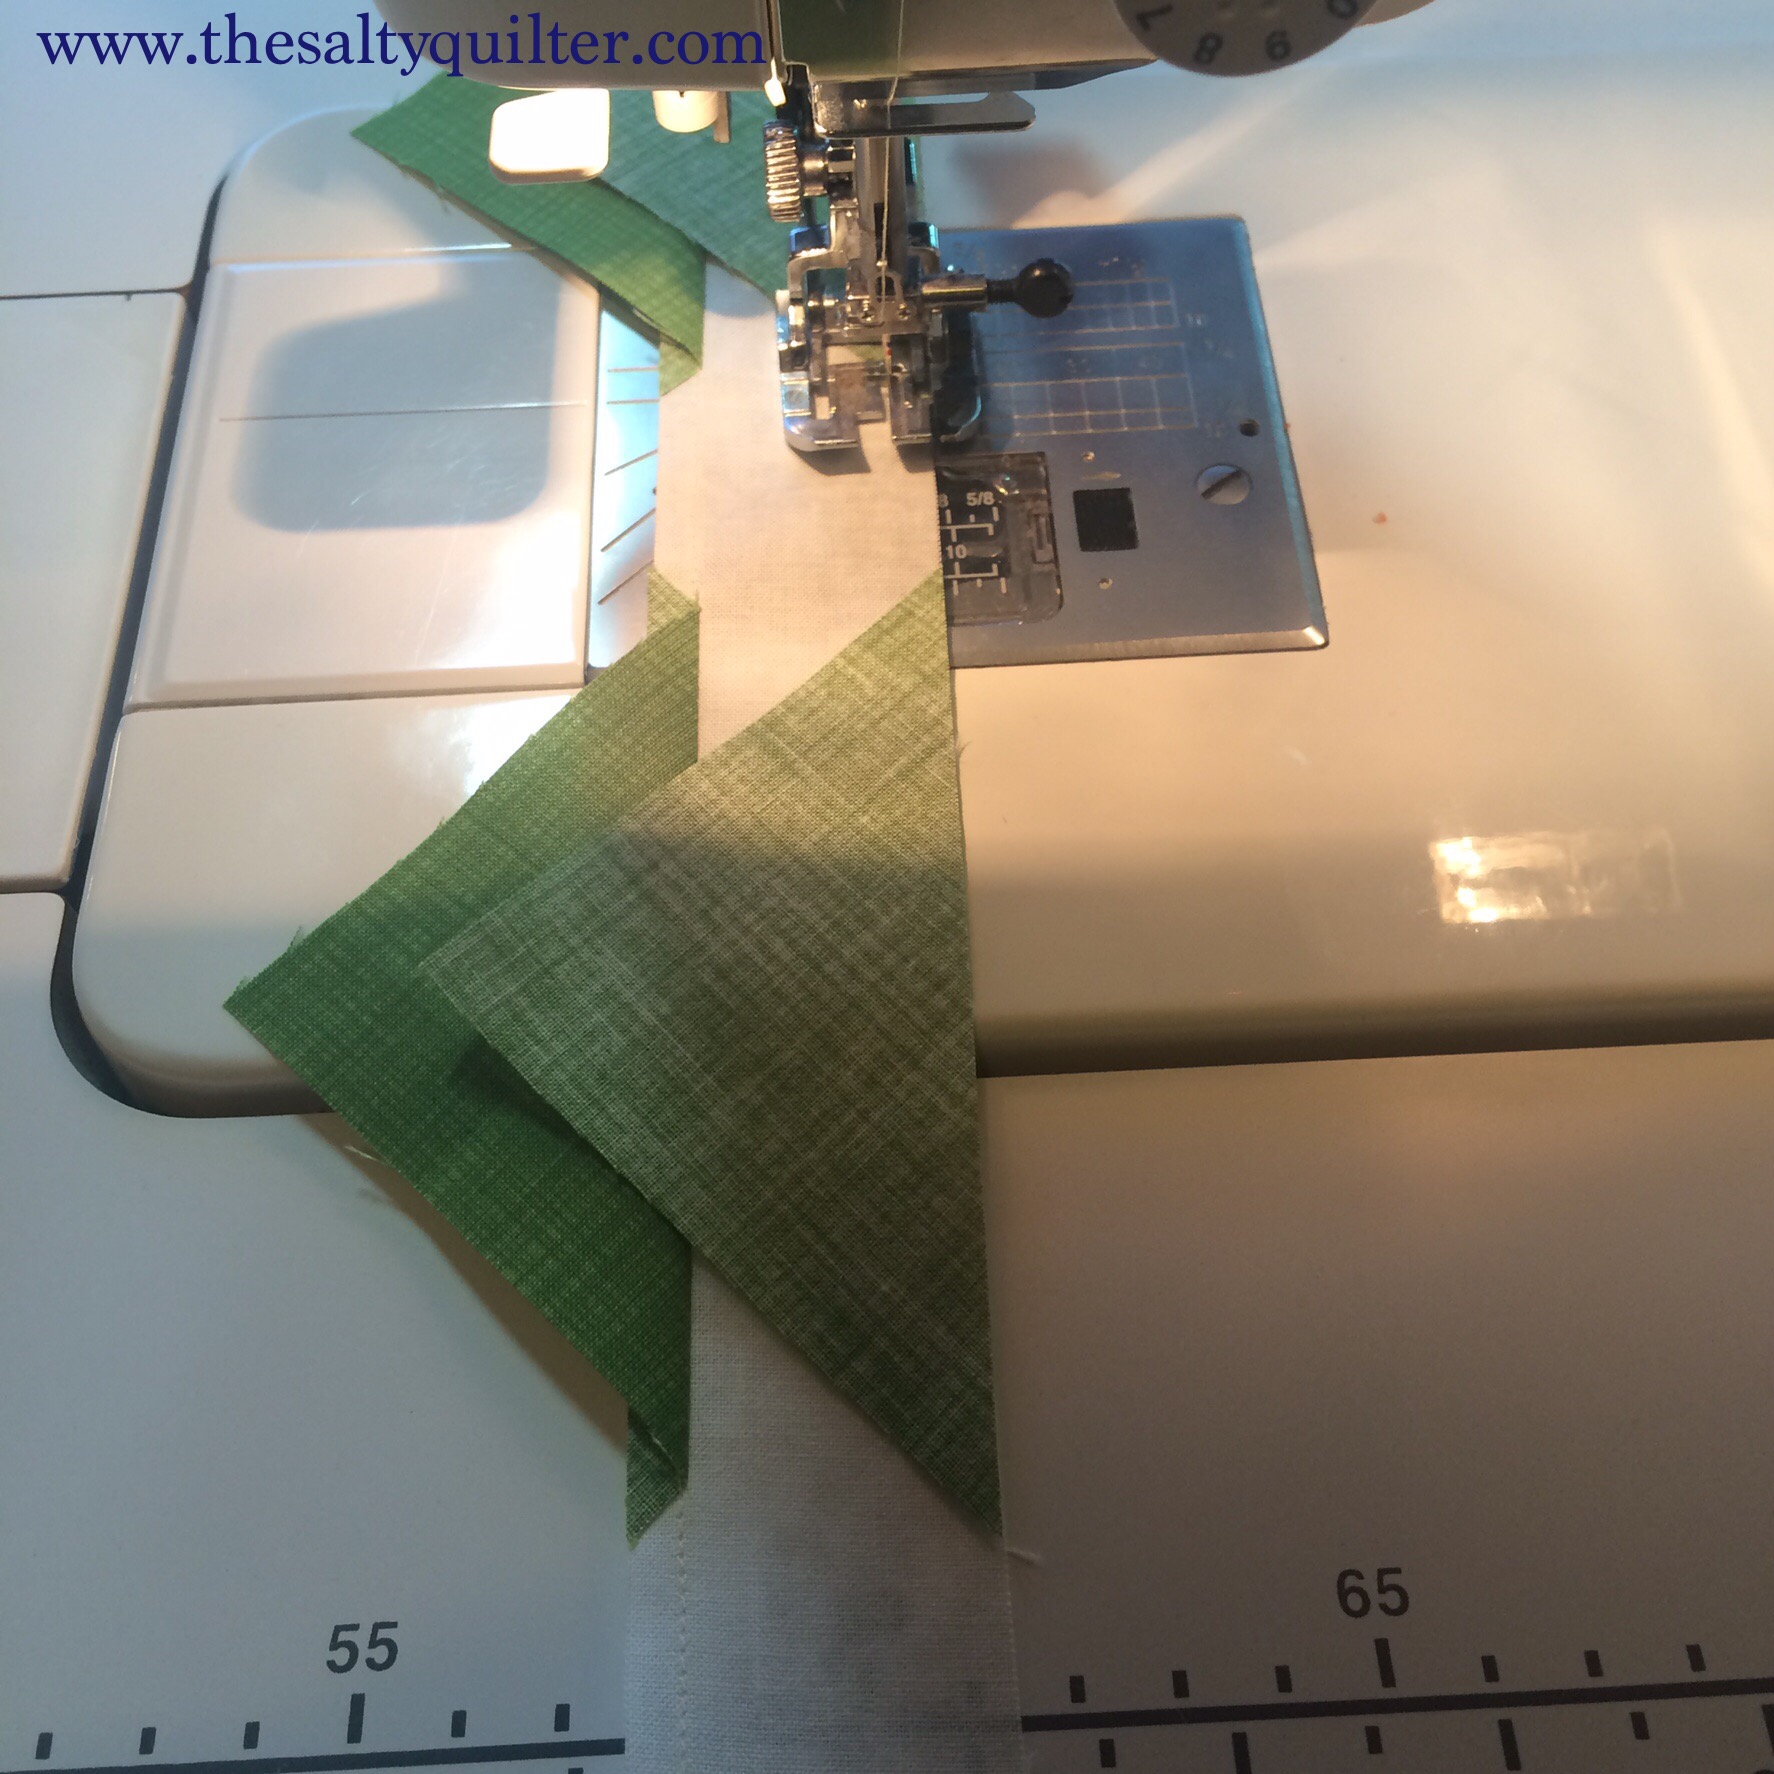
Start sewing one strip of the light colour fabric right side up. About an inch from the end, put a triangle with the long diagonal edge along the strip with right sides together. Sew through the triangle, and add another about two inches down the strip.
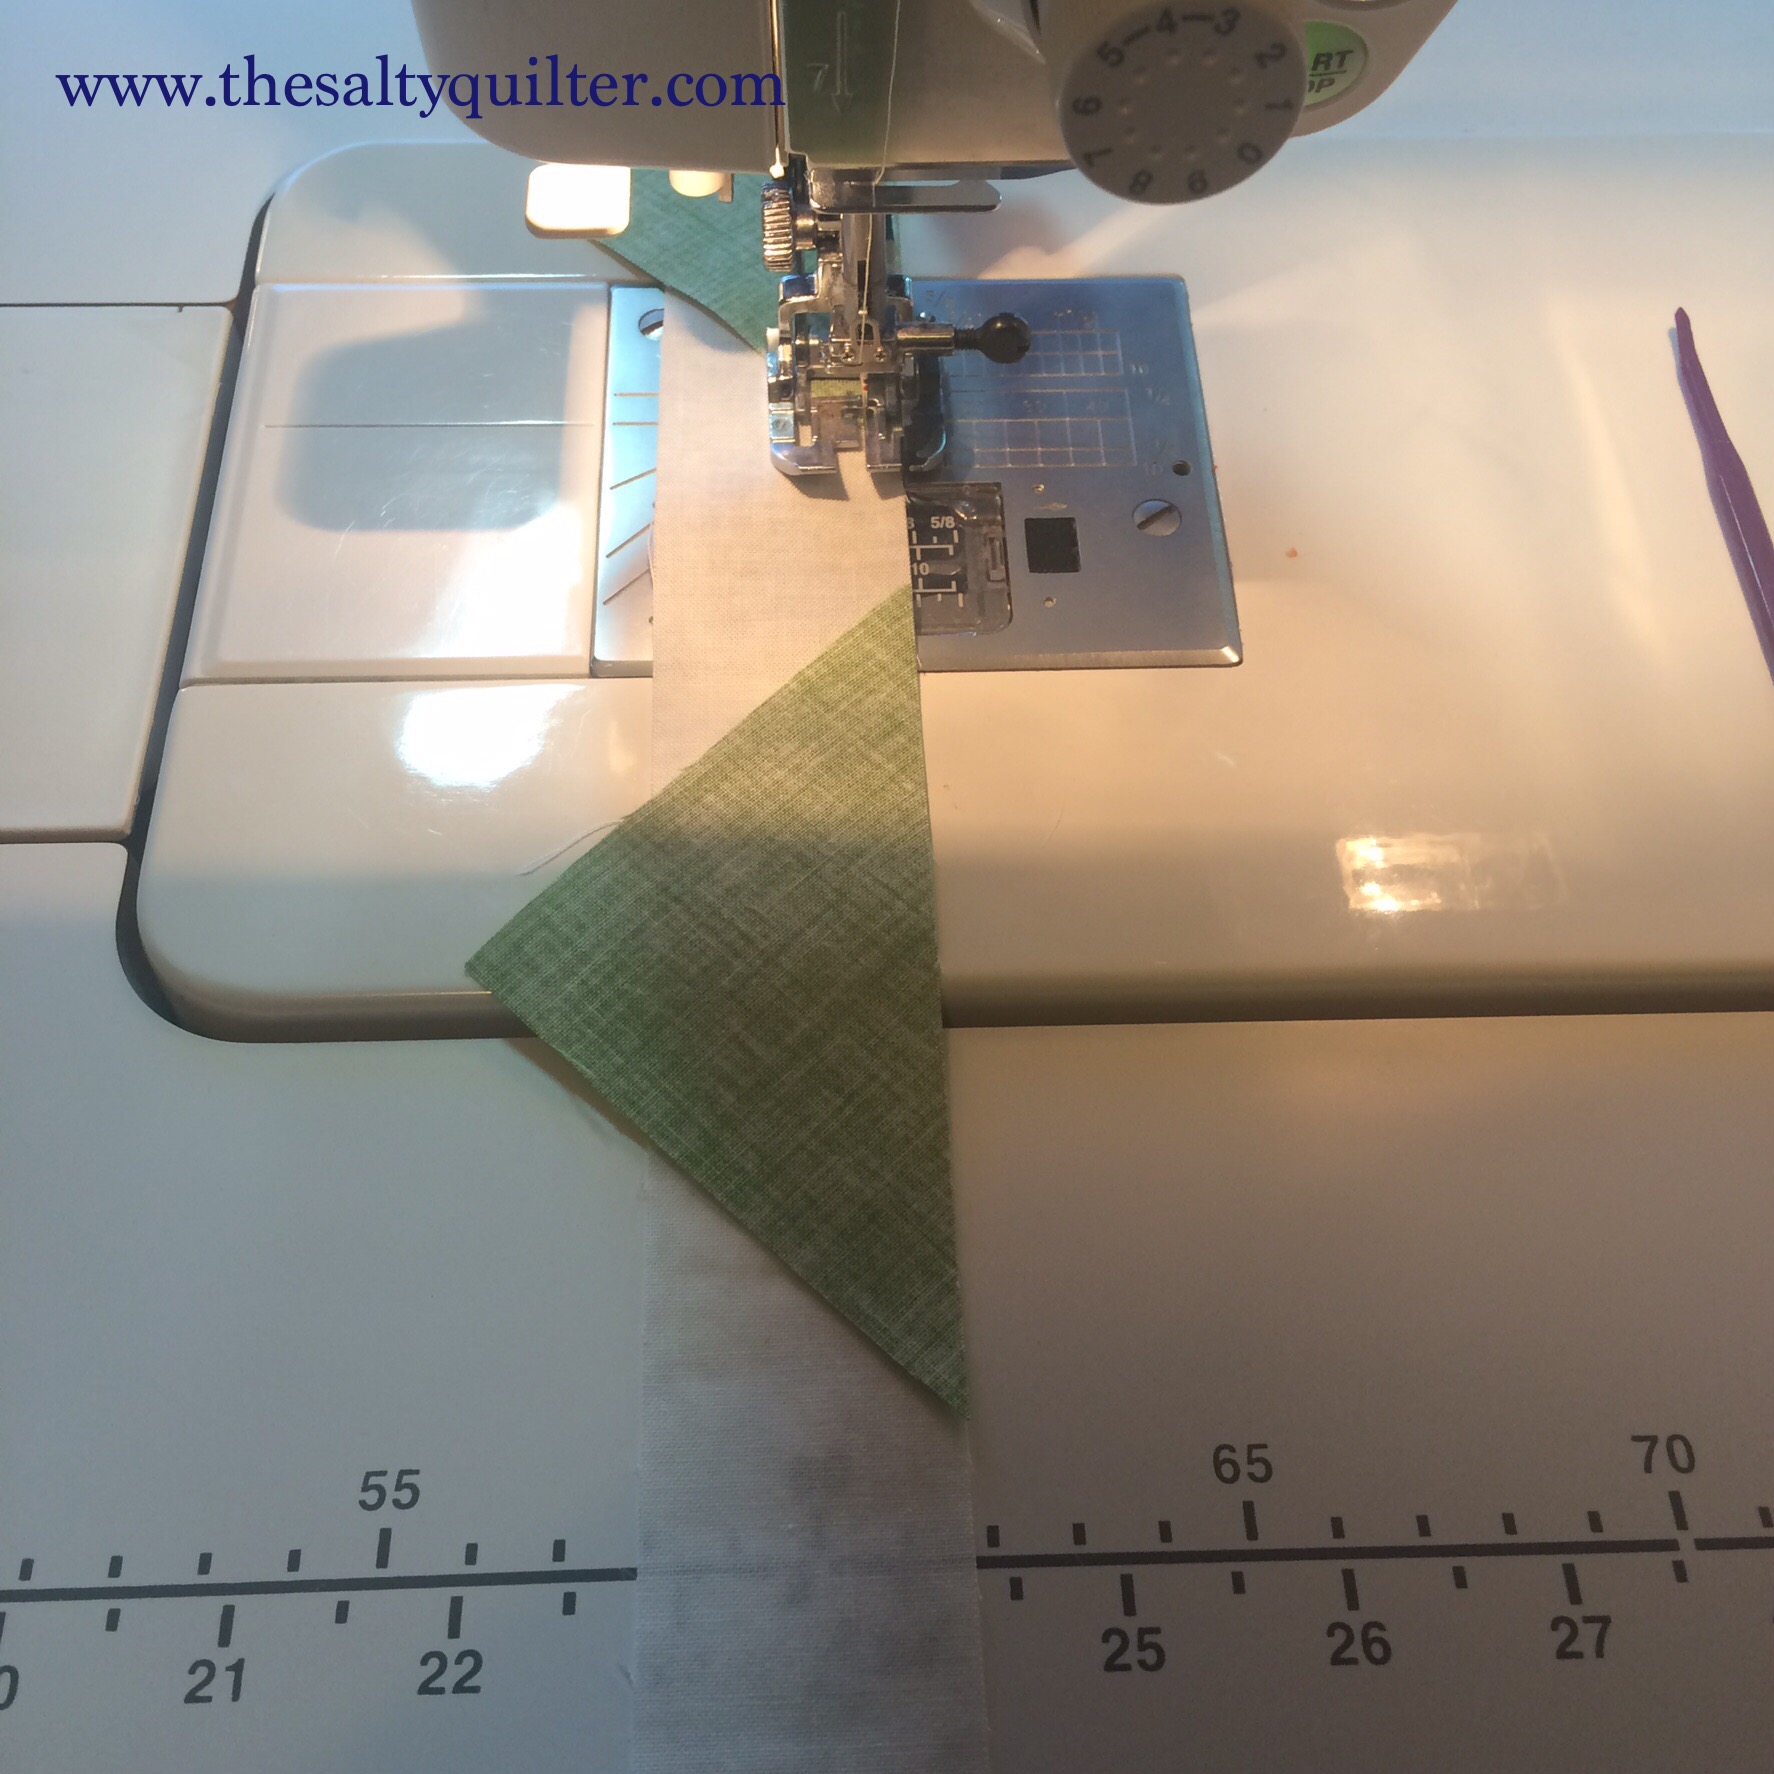
You’re sewing along the bias edge of the triangle, so be careful not to stretch it. Lower your presser foot pressure or use even feed if your sewing machine has it.
Keep adding in triangles until you reach the end of the strip. Once you know how many triangles you can fit on a strip, you can figure out the total strips required and cut more.
Add another strip and continue to sew triangles until you reach the end of one of your stacks.
Step 3:
Cut apart your strips and take them to your ironing board. Carefully press them towards the background fabric.

Check out my Yummy Sushi ironing board cover!
Step 4:
Go back to the sewing machine. Start sewing at the end of one of your strips. Put a triangle on the edge of the strip, aligning the points with the triangle opposite. It doesn’t have to be exact, just eyeball it. Sew the triangle to the strip.
Repeat adding triangles and strips until you reach the end of your stack and strips.
Step 5:
Cut the strips apart. Go back to your ironing board and press the triangles towards the background fabric. Now is the time to give them some more starch or Best Press to get those mofos flat.

Step 6:
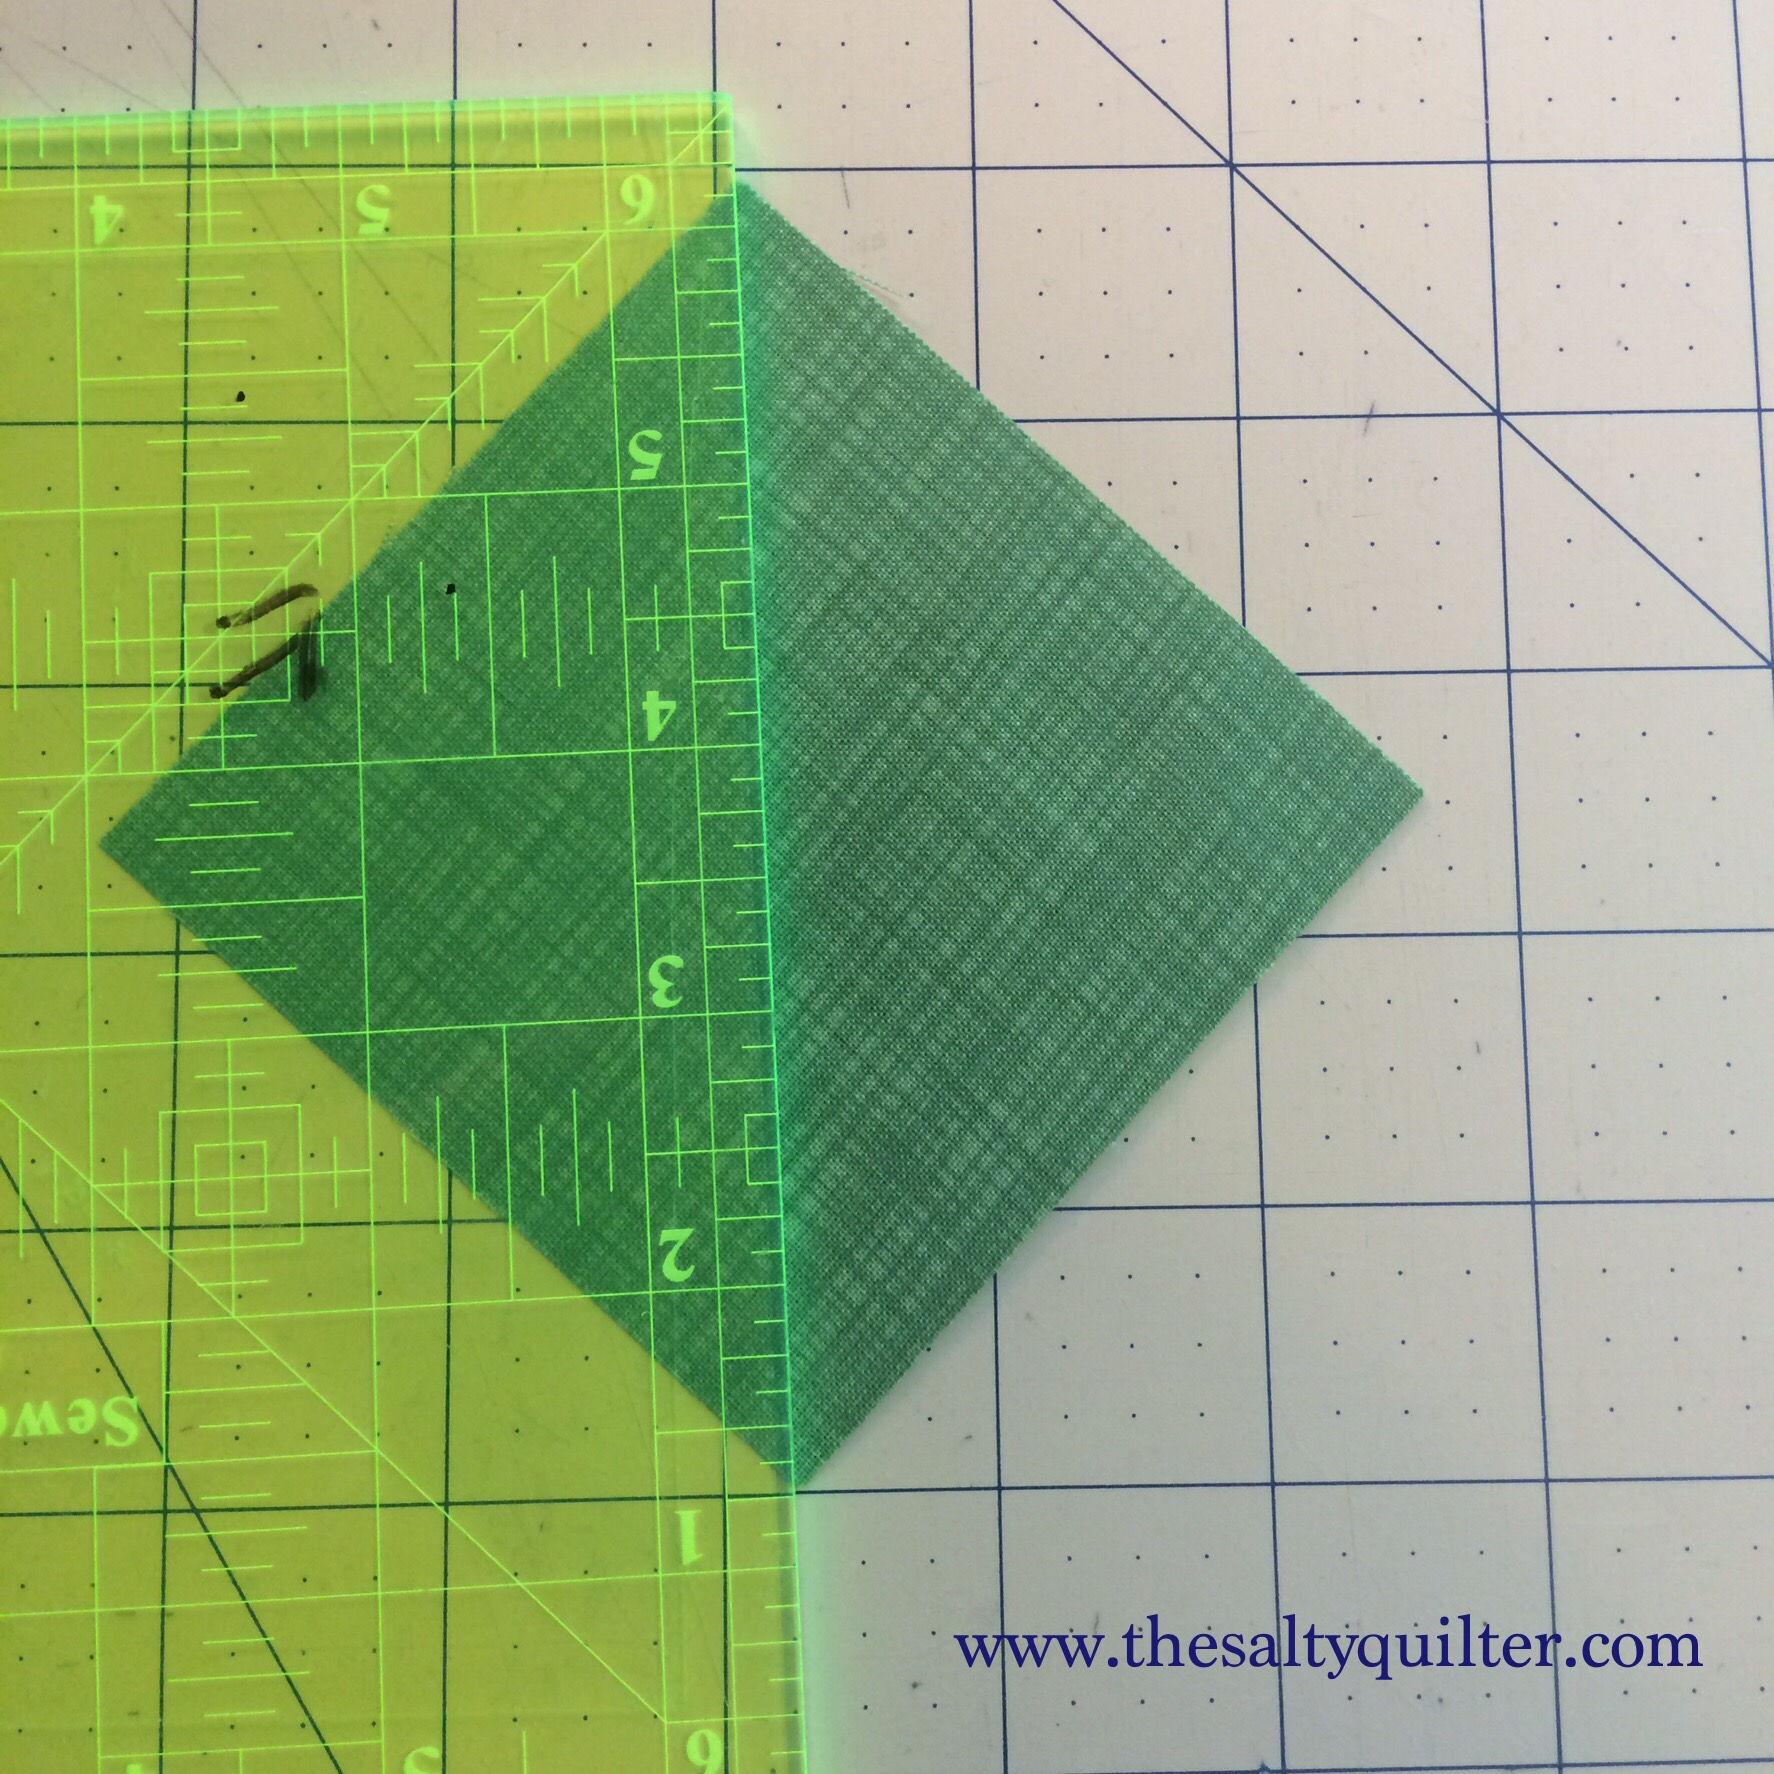
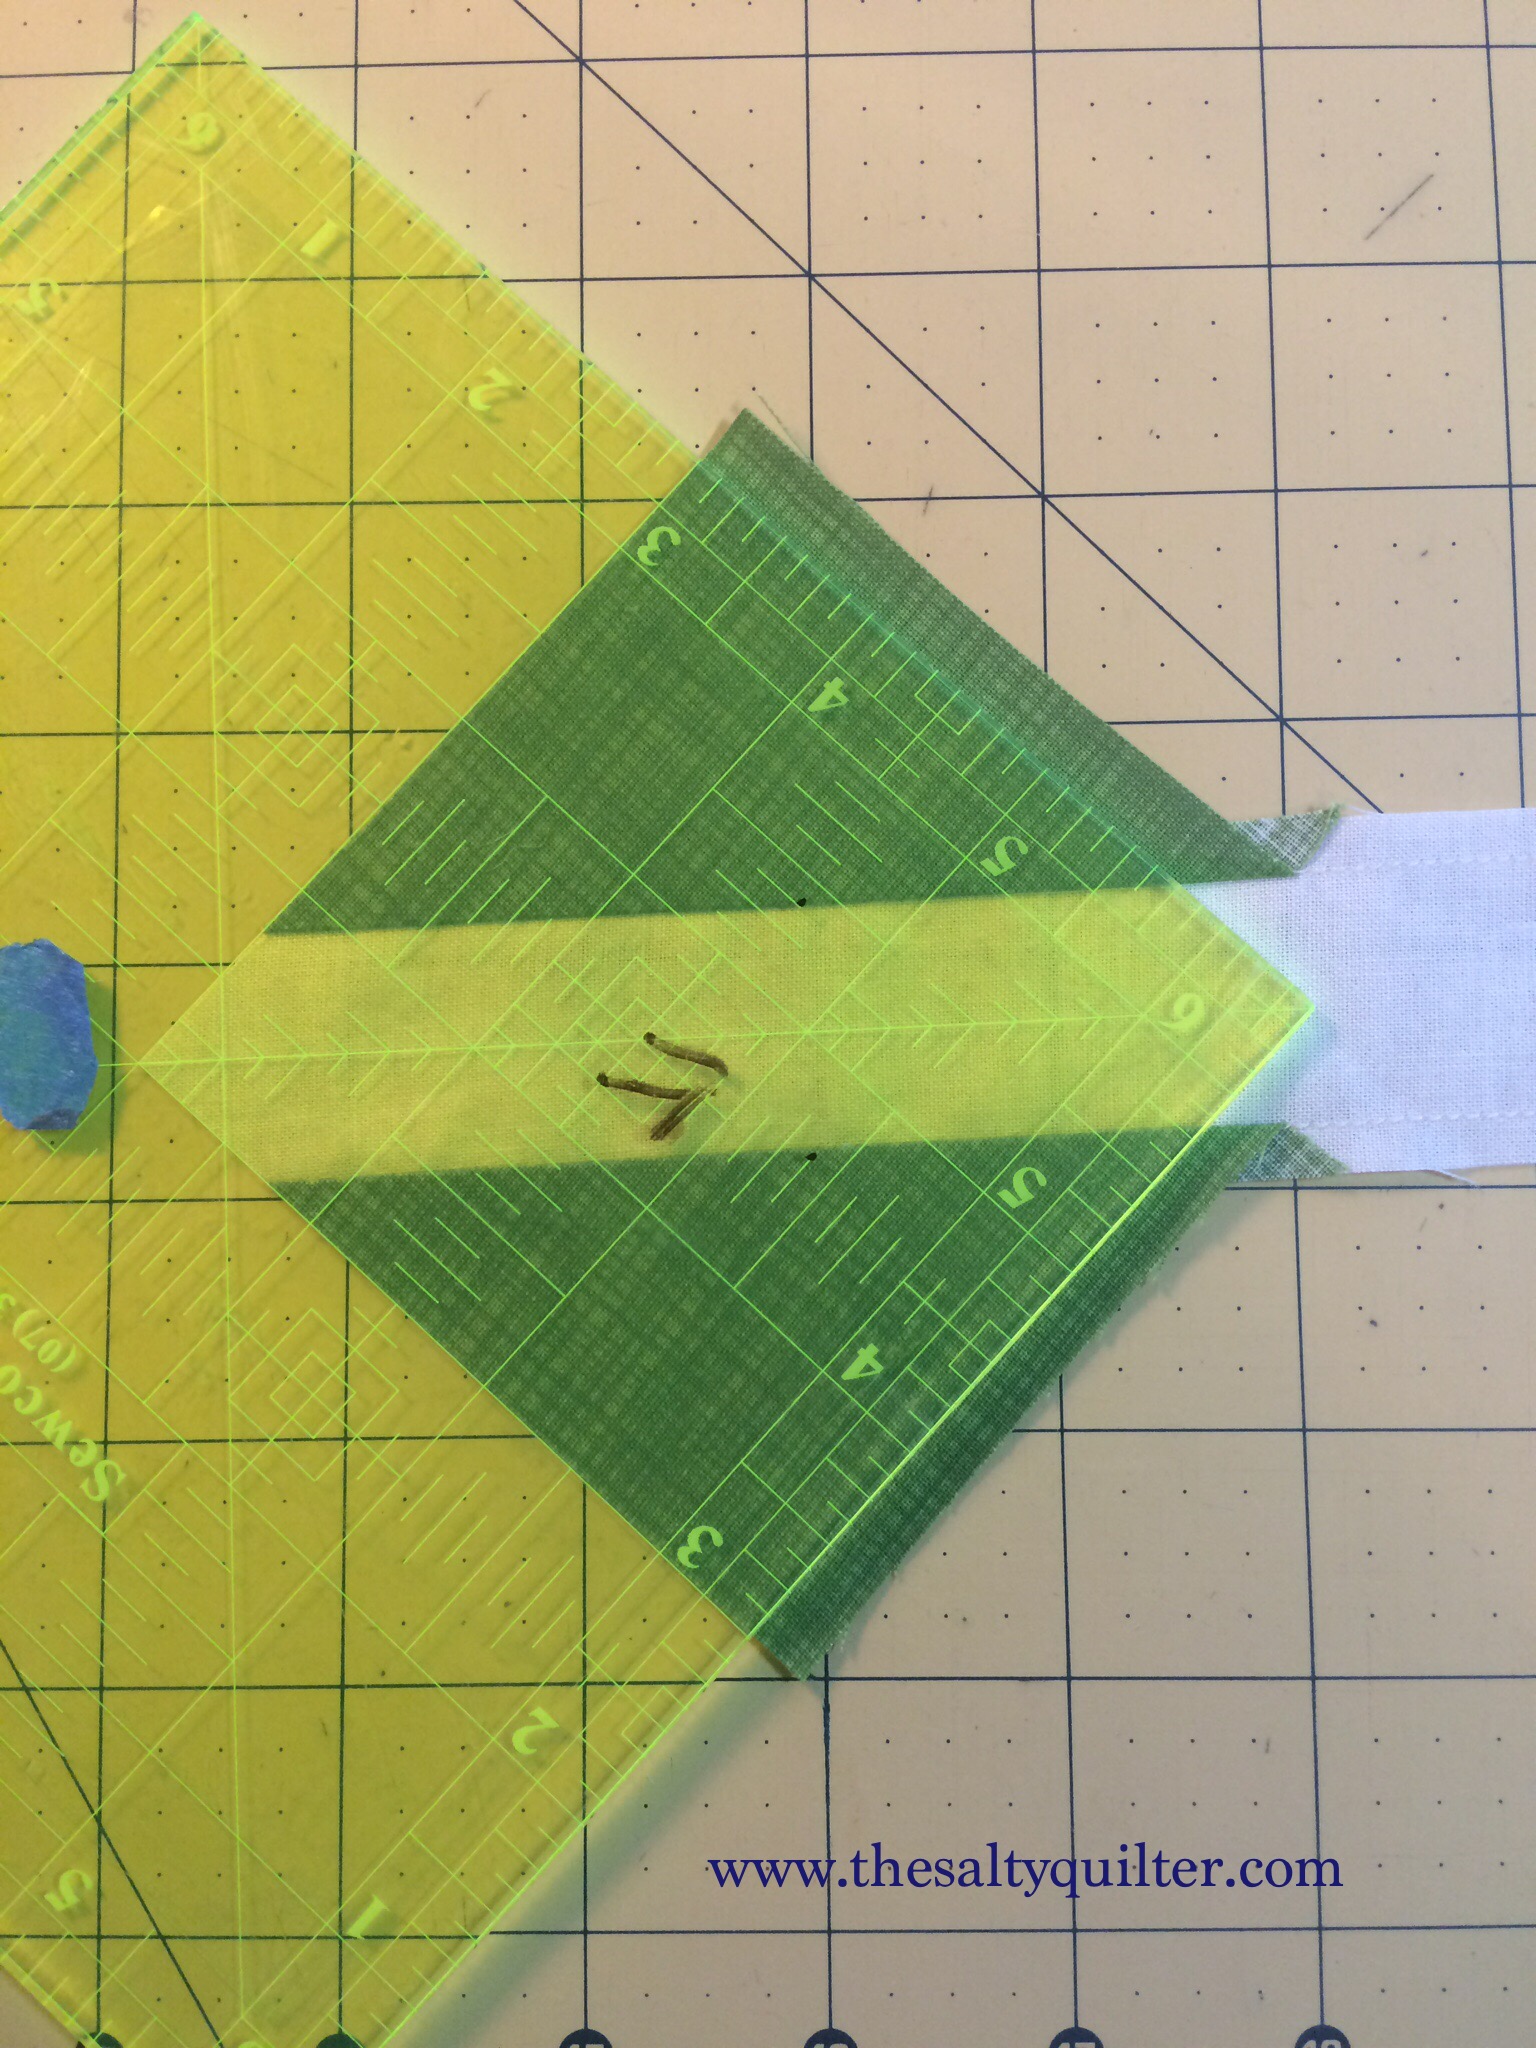
Take your strips to the cutting board. Using a square ruler, align the diagonal through the middle of the light colour strip. Use the markings on your ruler to align evenly – I used a dot of Sharpie to mark where I needed to align to the seam to be centred.
Cut the two edges of the block.
It’s easiest to do the first side of each block on a strip at one time.
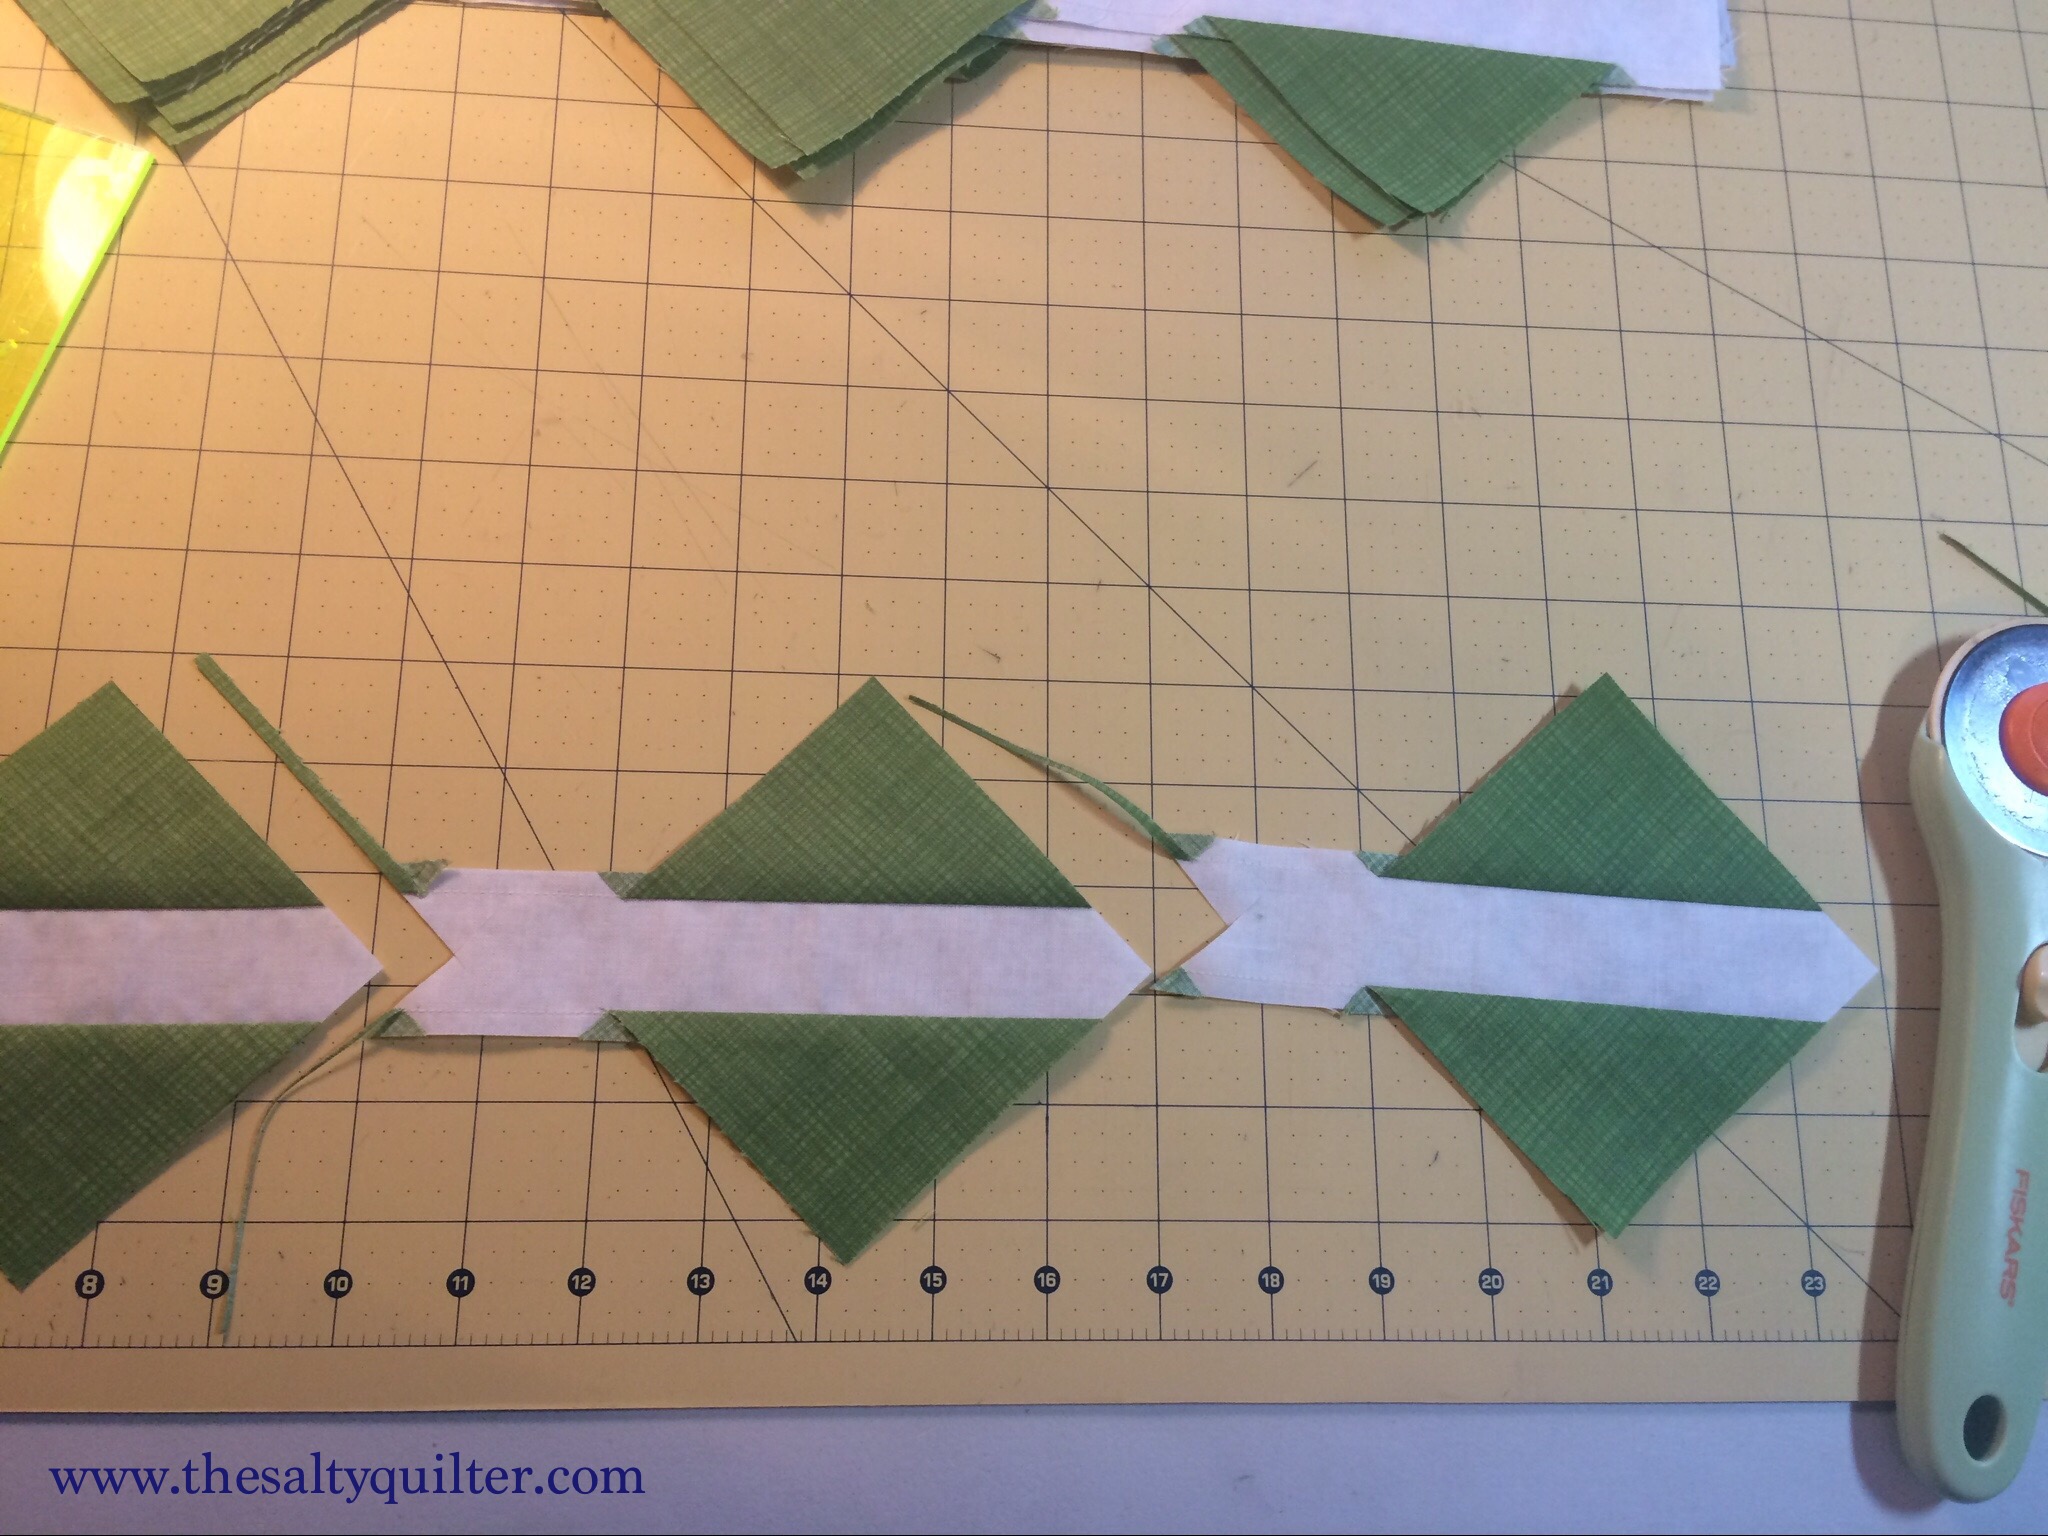
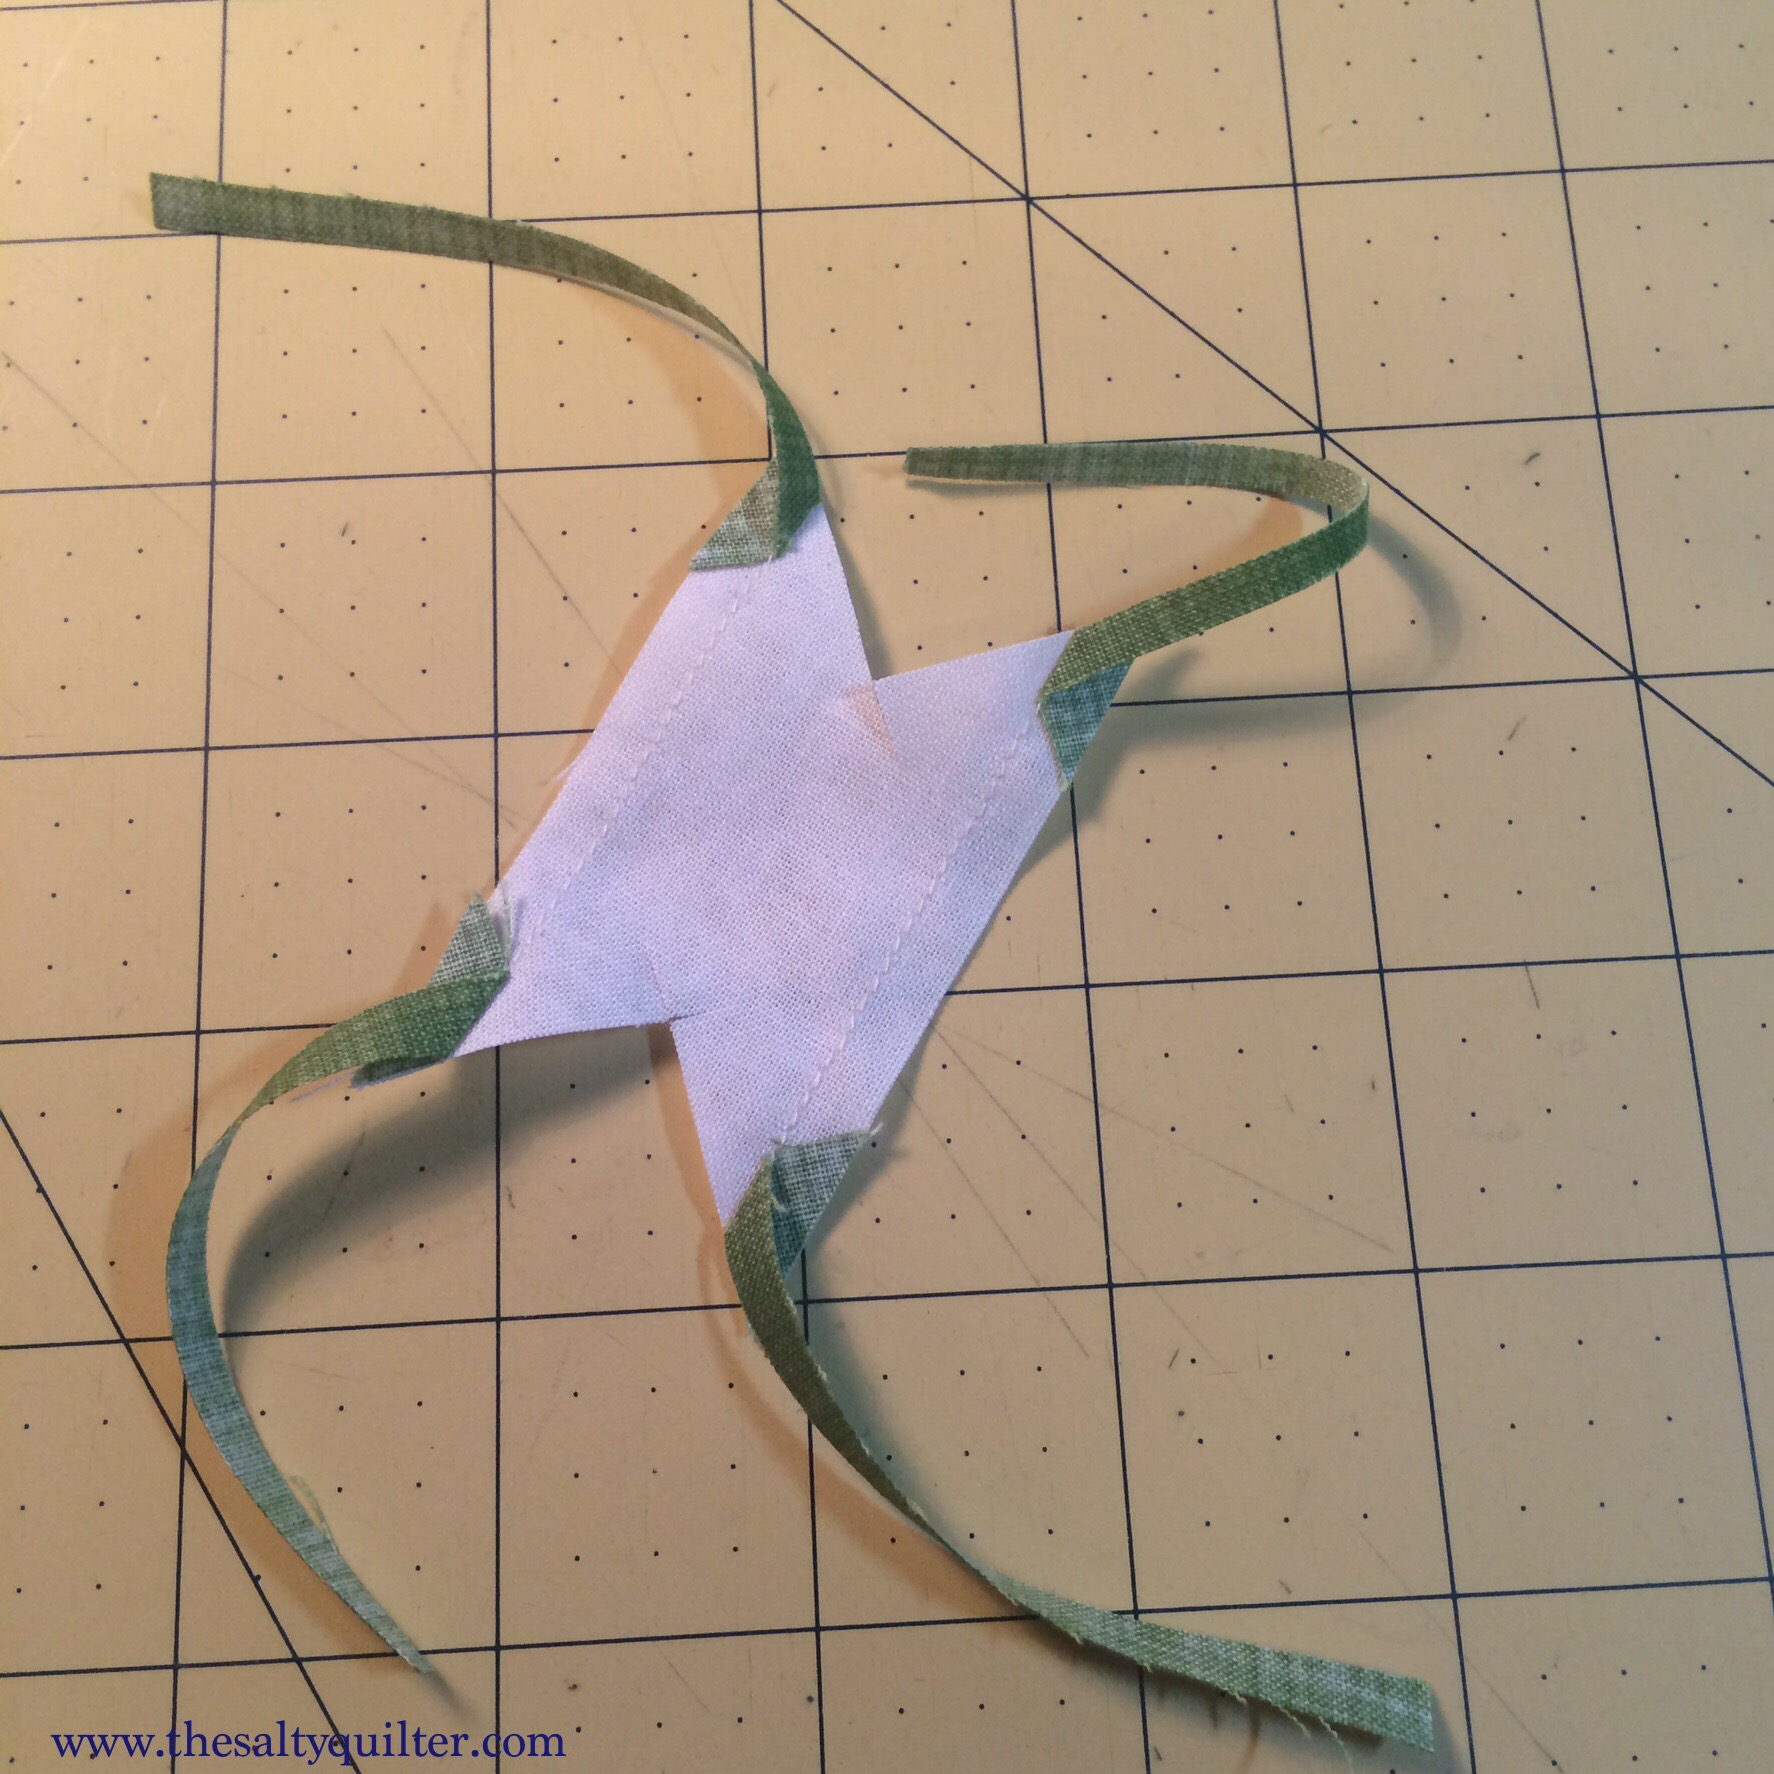
They look sort of like weird-ass sting rays.
Step 7:
Flip your blocks around and trim from the other side to the final unsewn size. In my case 3 1/2″. Use your ruler markings to keep the strip aligned in the centre.
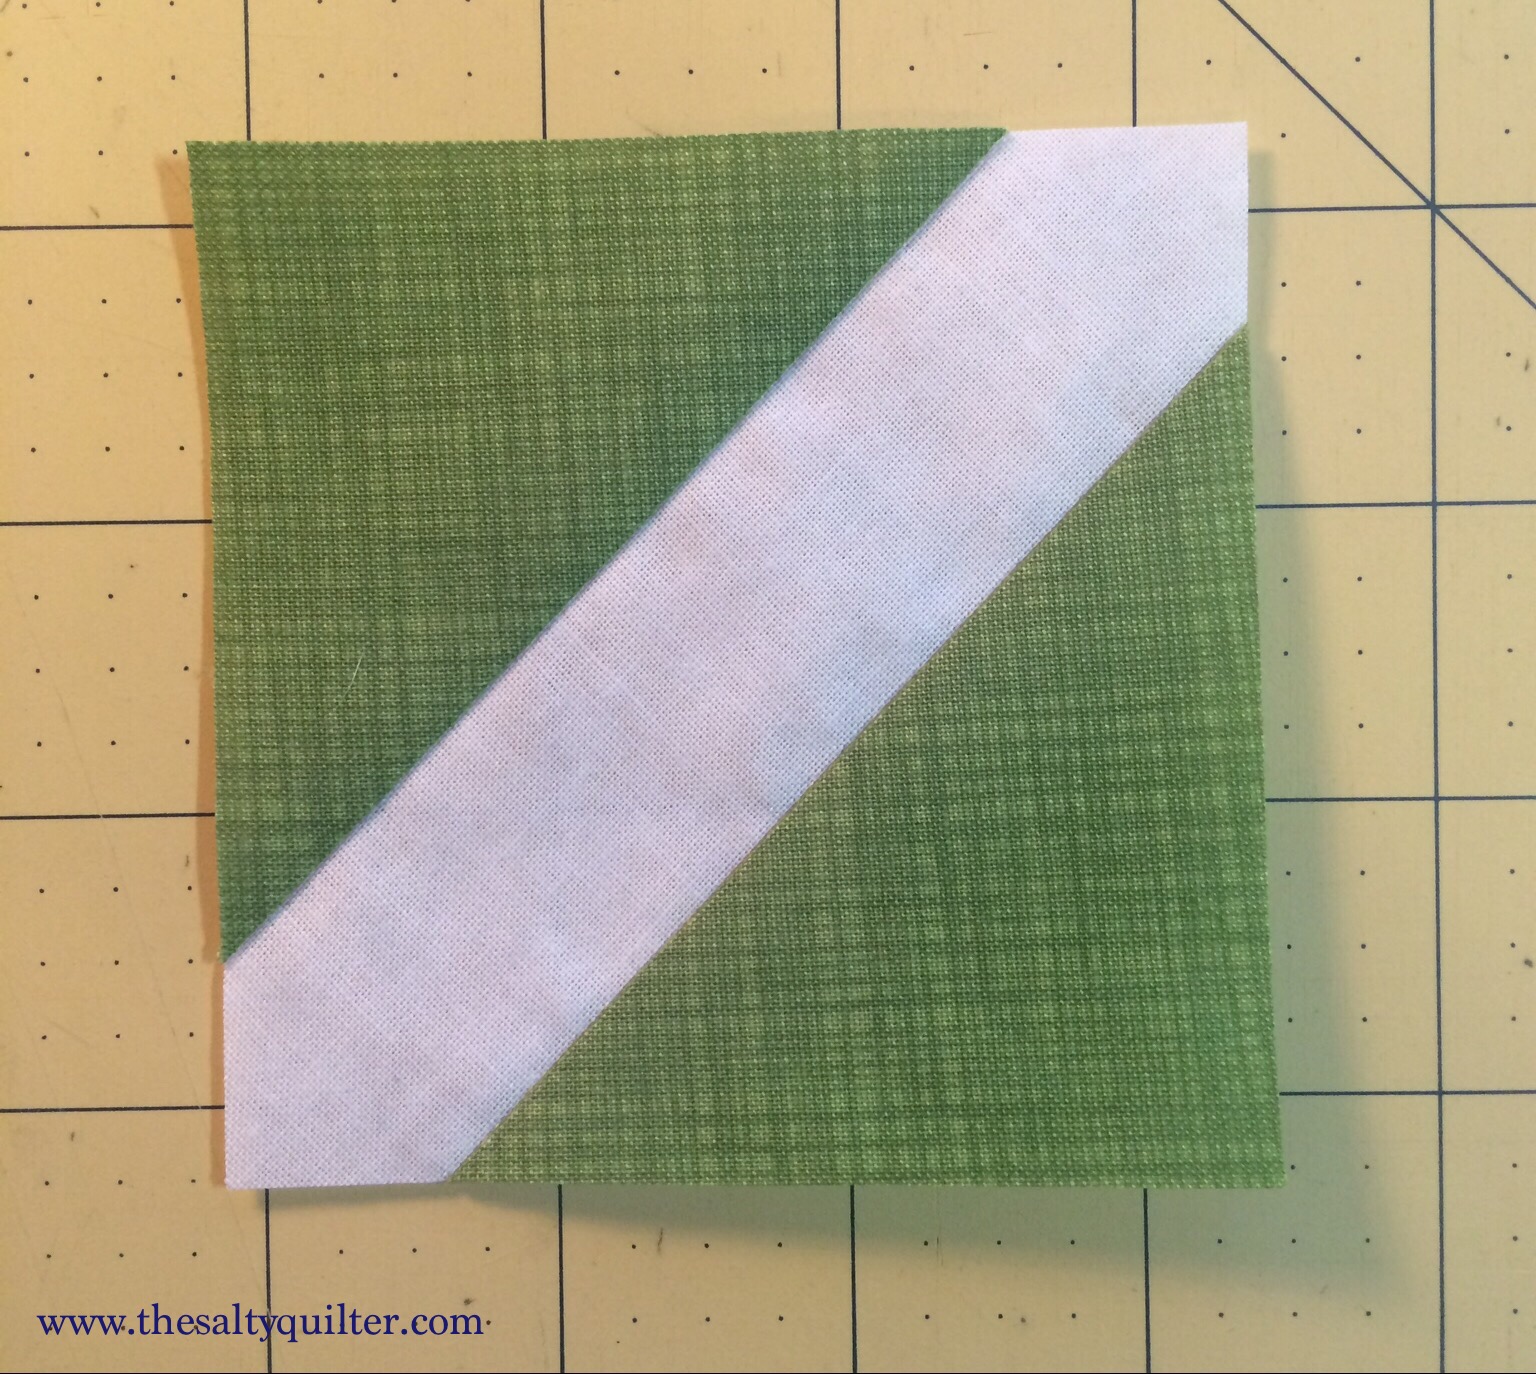
And there you go!
And the only waste are these little flappy things that look like you decapitated one of those inflatable advertising guys.
If people are actually signing the blocks, iron them onto the waxy side of freezer paper to better stabilise them. I’m a fan of the Micron fine point marking pen for fabric.
You could hand embroider over the signatures, or machine embroider the text straight onto the block.
There are a bunch of ways you could layout your blocks. I have two background colours for mine.
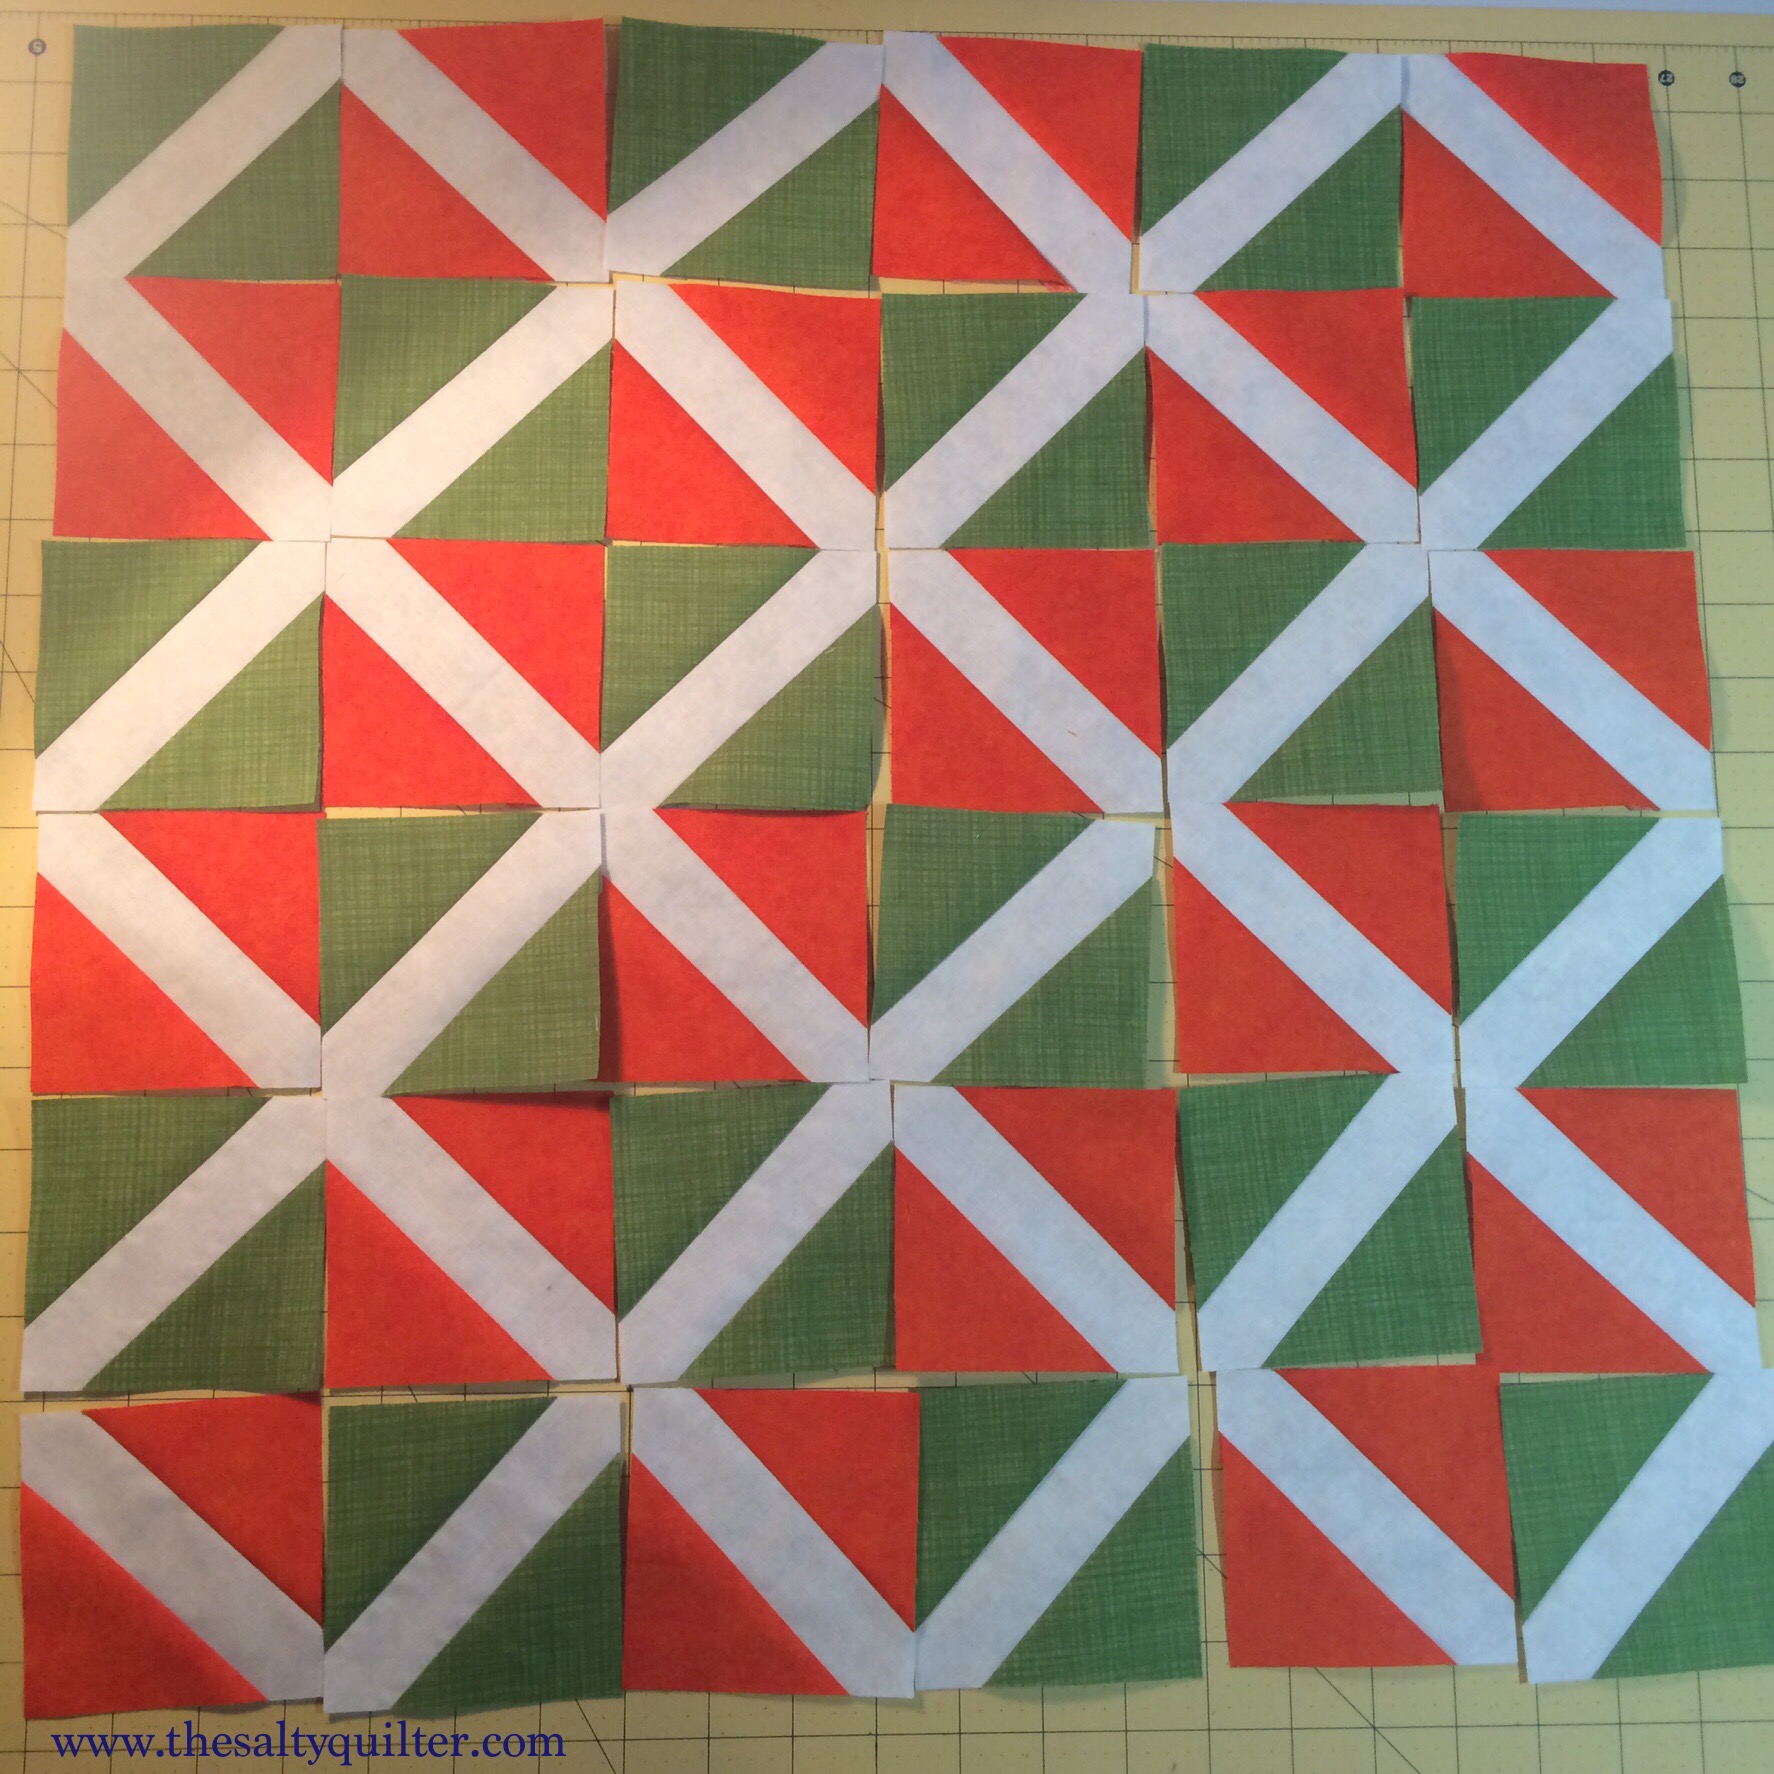
Lattice
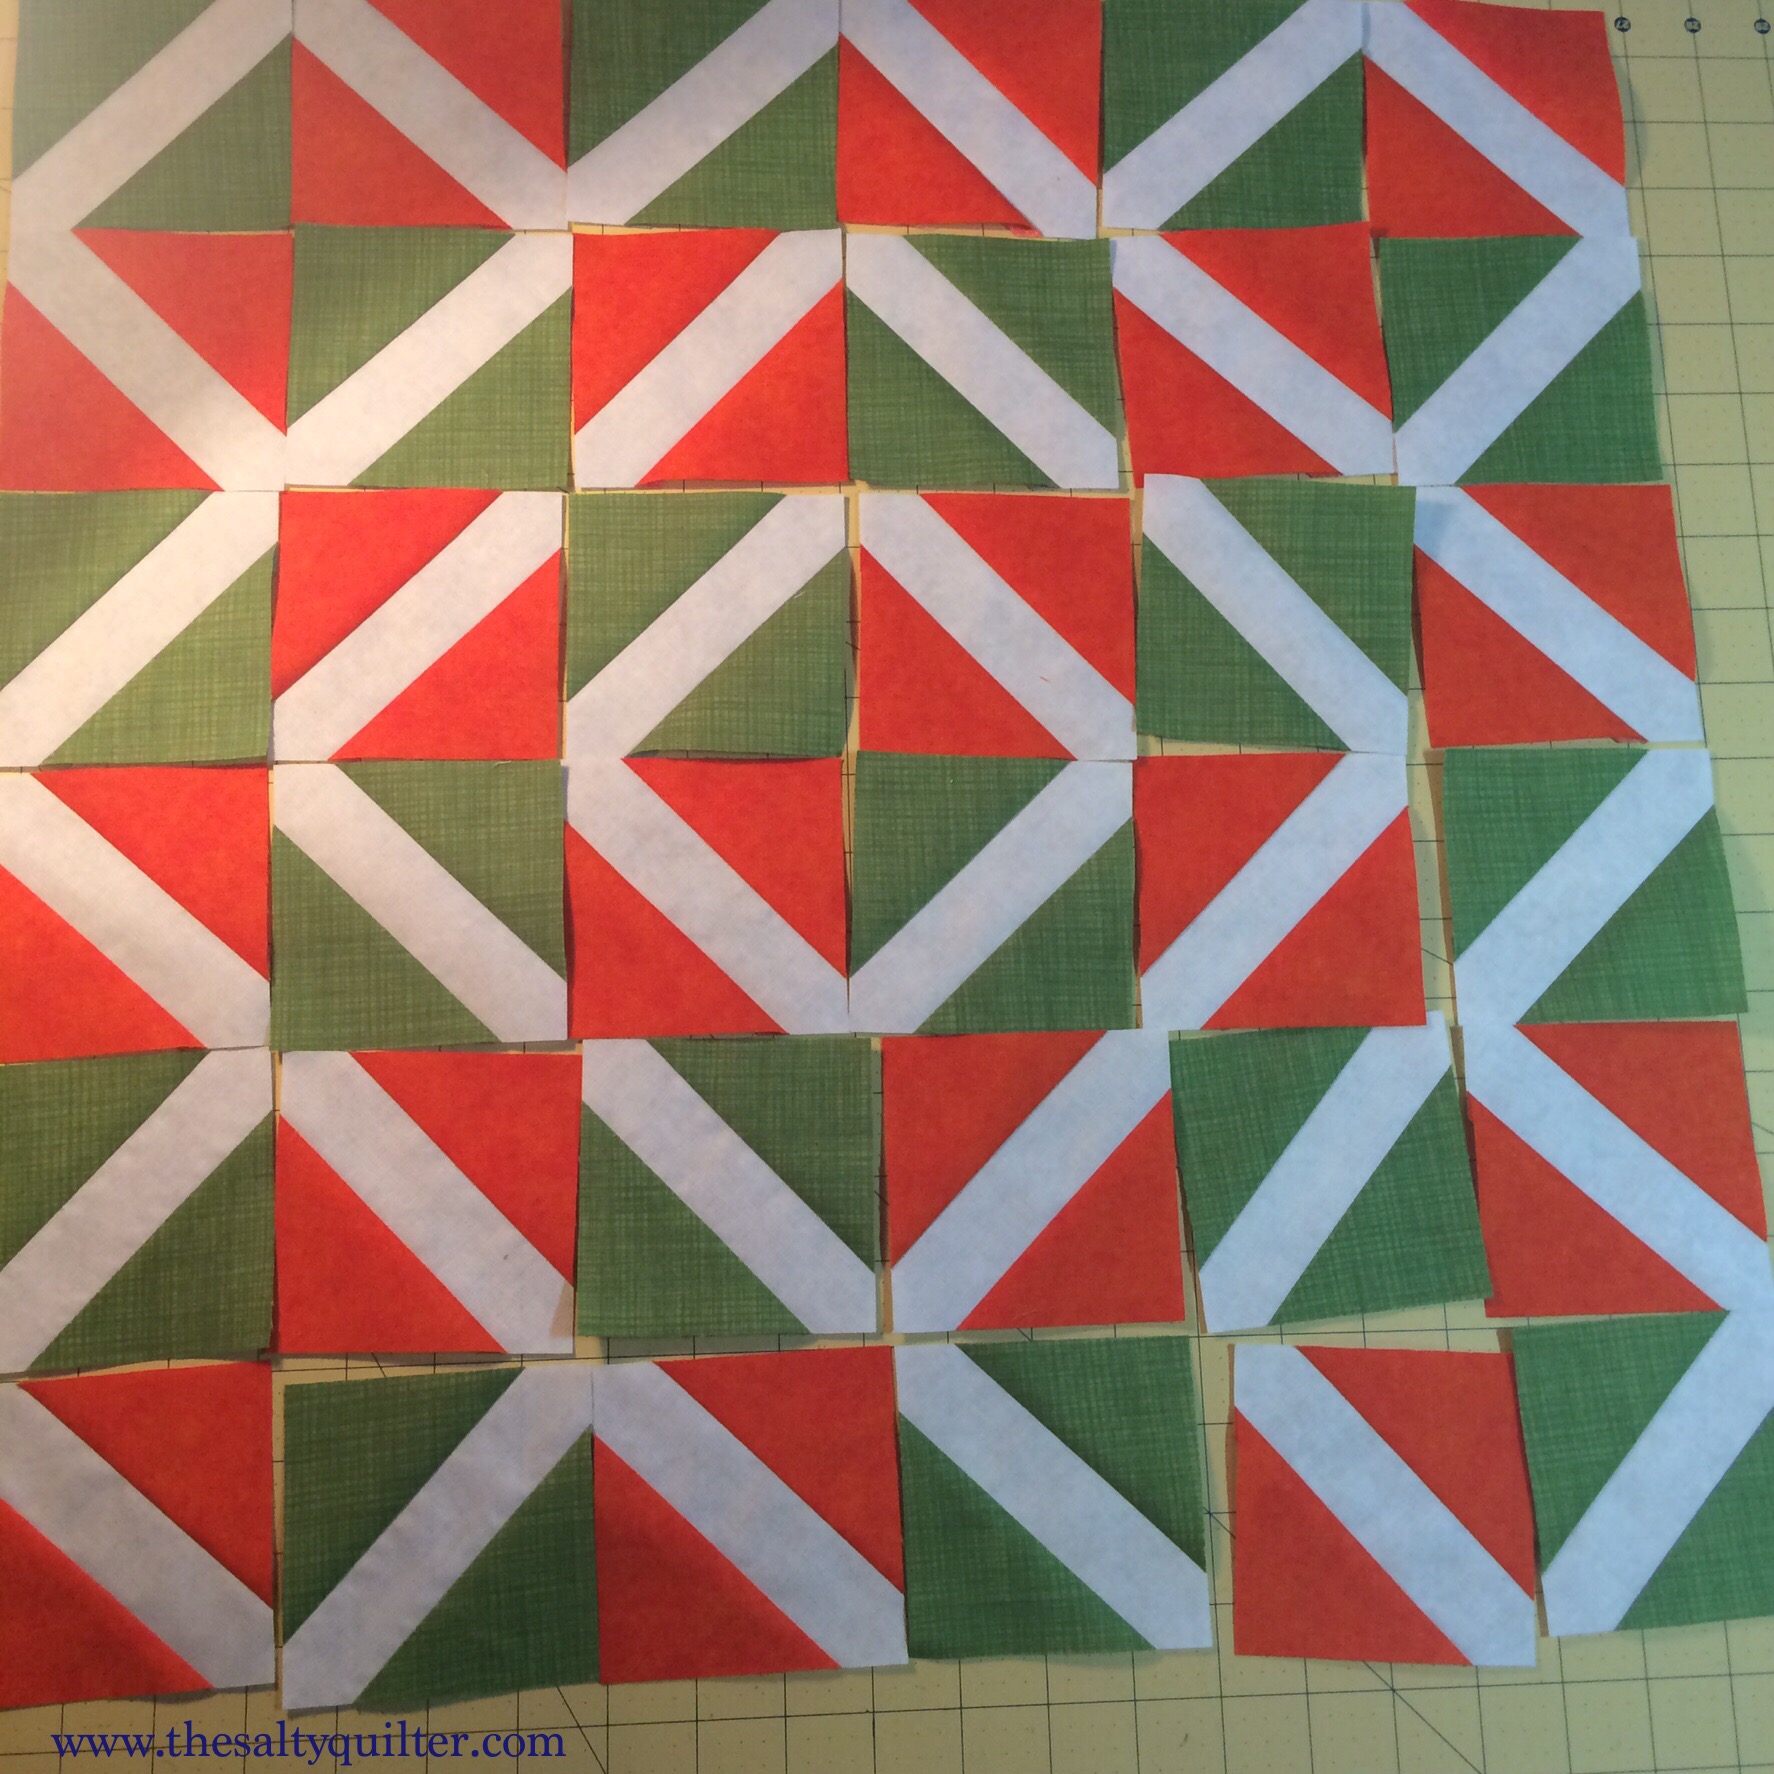
Hybrid layout
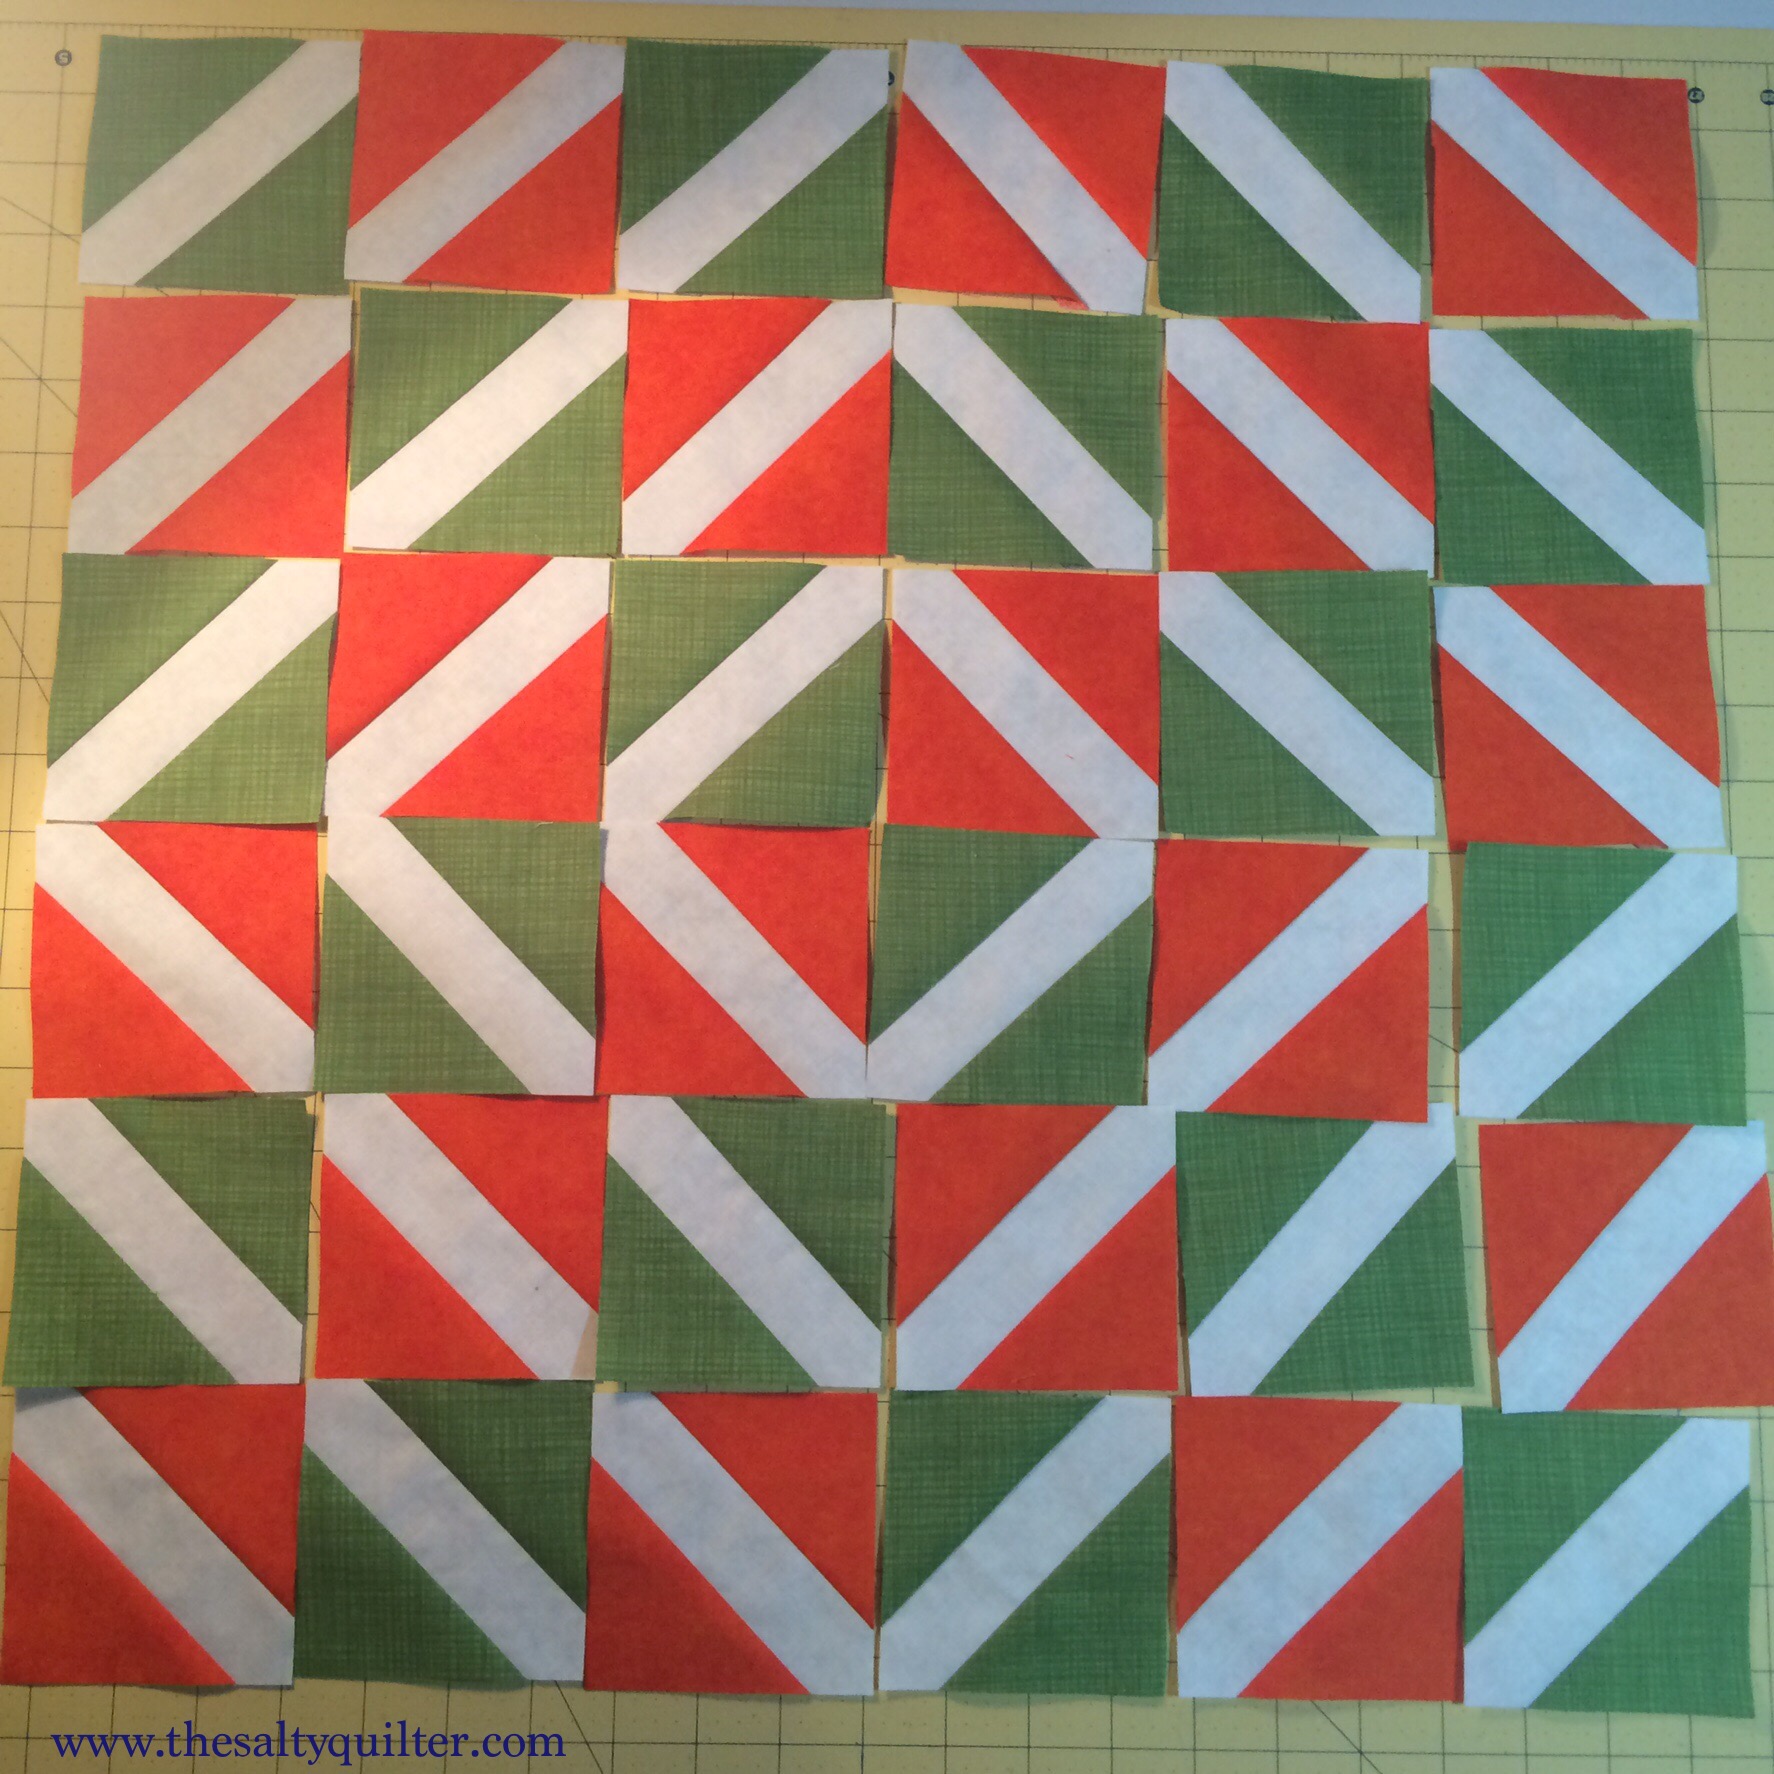
Barn raising
And that’s it. Please tell me how I did on my first tutorial and let me know if you make any signature blocks.
Quilting and Sewing Myths Busted
August 7, 2015
I pride myself in being a bit of a skeptic, especially when it comes to Random Stuff on the Internet. Yes, I’m that asshole who always links to Snopes when people share obviously bullshit stuff on Facebook.

When it comes to quilting and sewing, there is no shortage of myths, and even bald faced lies. Many people are likely familiar with the de-bunking of common historical quilting myths like the Underground Railroad quilts or that that the Amish purposefully make a mistake on their quilts because only God is perfect (if this is true, I have a complaint to make about my knee joints).
I’m not going to cover the common historical myths, as those have pretty much been addressed exhaustively. However, I’m keen to research more in to the modern myths that still affect quilters today.
Some I have in mind:
- You must use cotton thread in your quilts
- Bamboo batting will catch on fire easily
- Bias binding is the strongest and best option
Are there any other quilt myths you’ve wondered about?

Poor Dennis – The World’s Saddest Male Quilter
August 5, 2015
In the May issue of Quilters Newsletter, there was a letter to the editor from Dennis. Dennis objected to Mary Fons using “her” as the default pronoun for quilters.
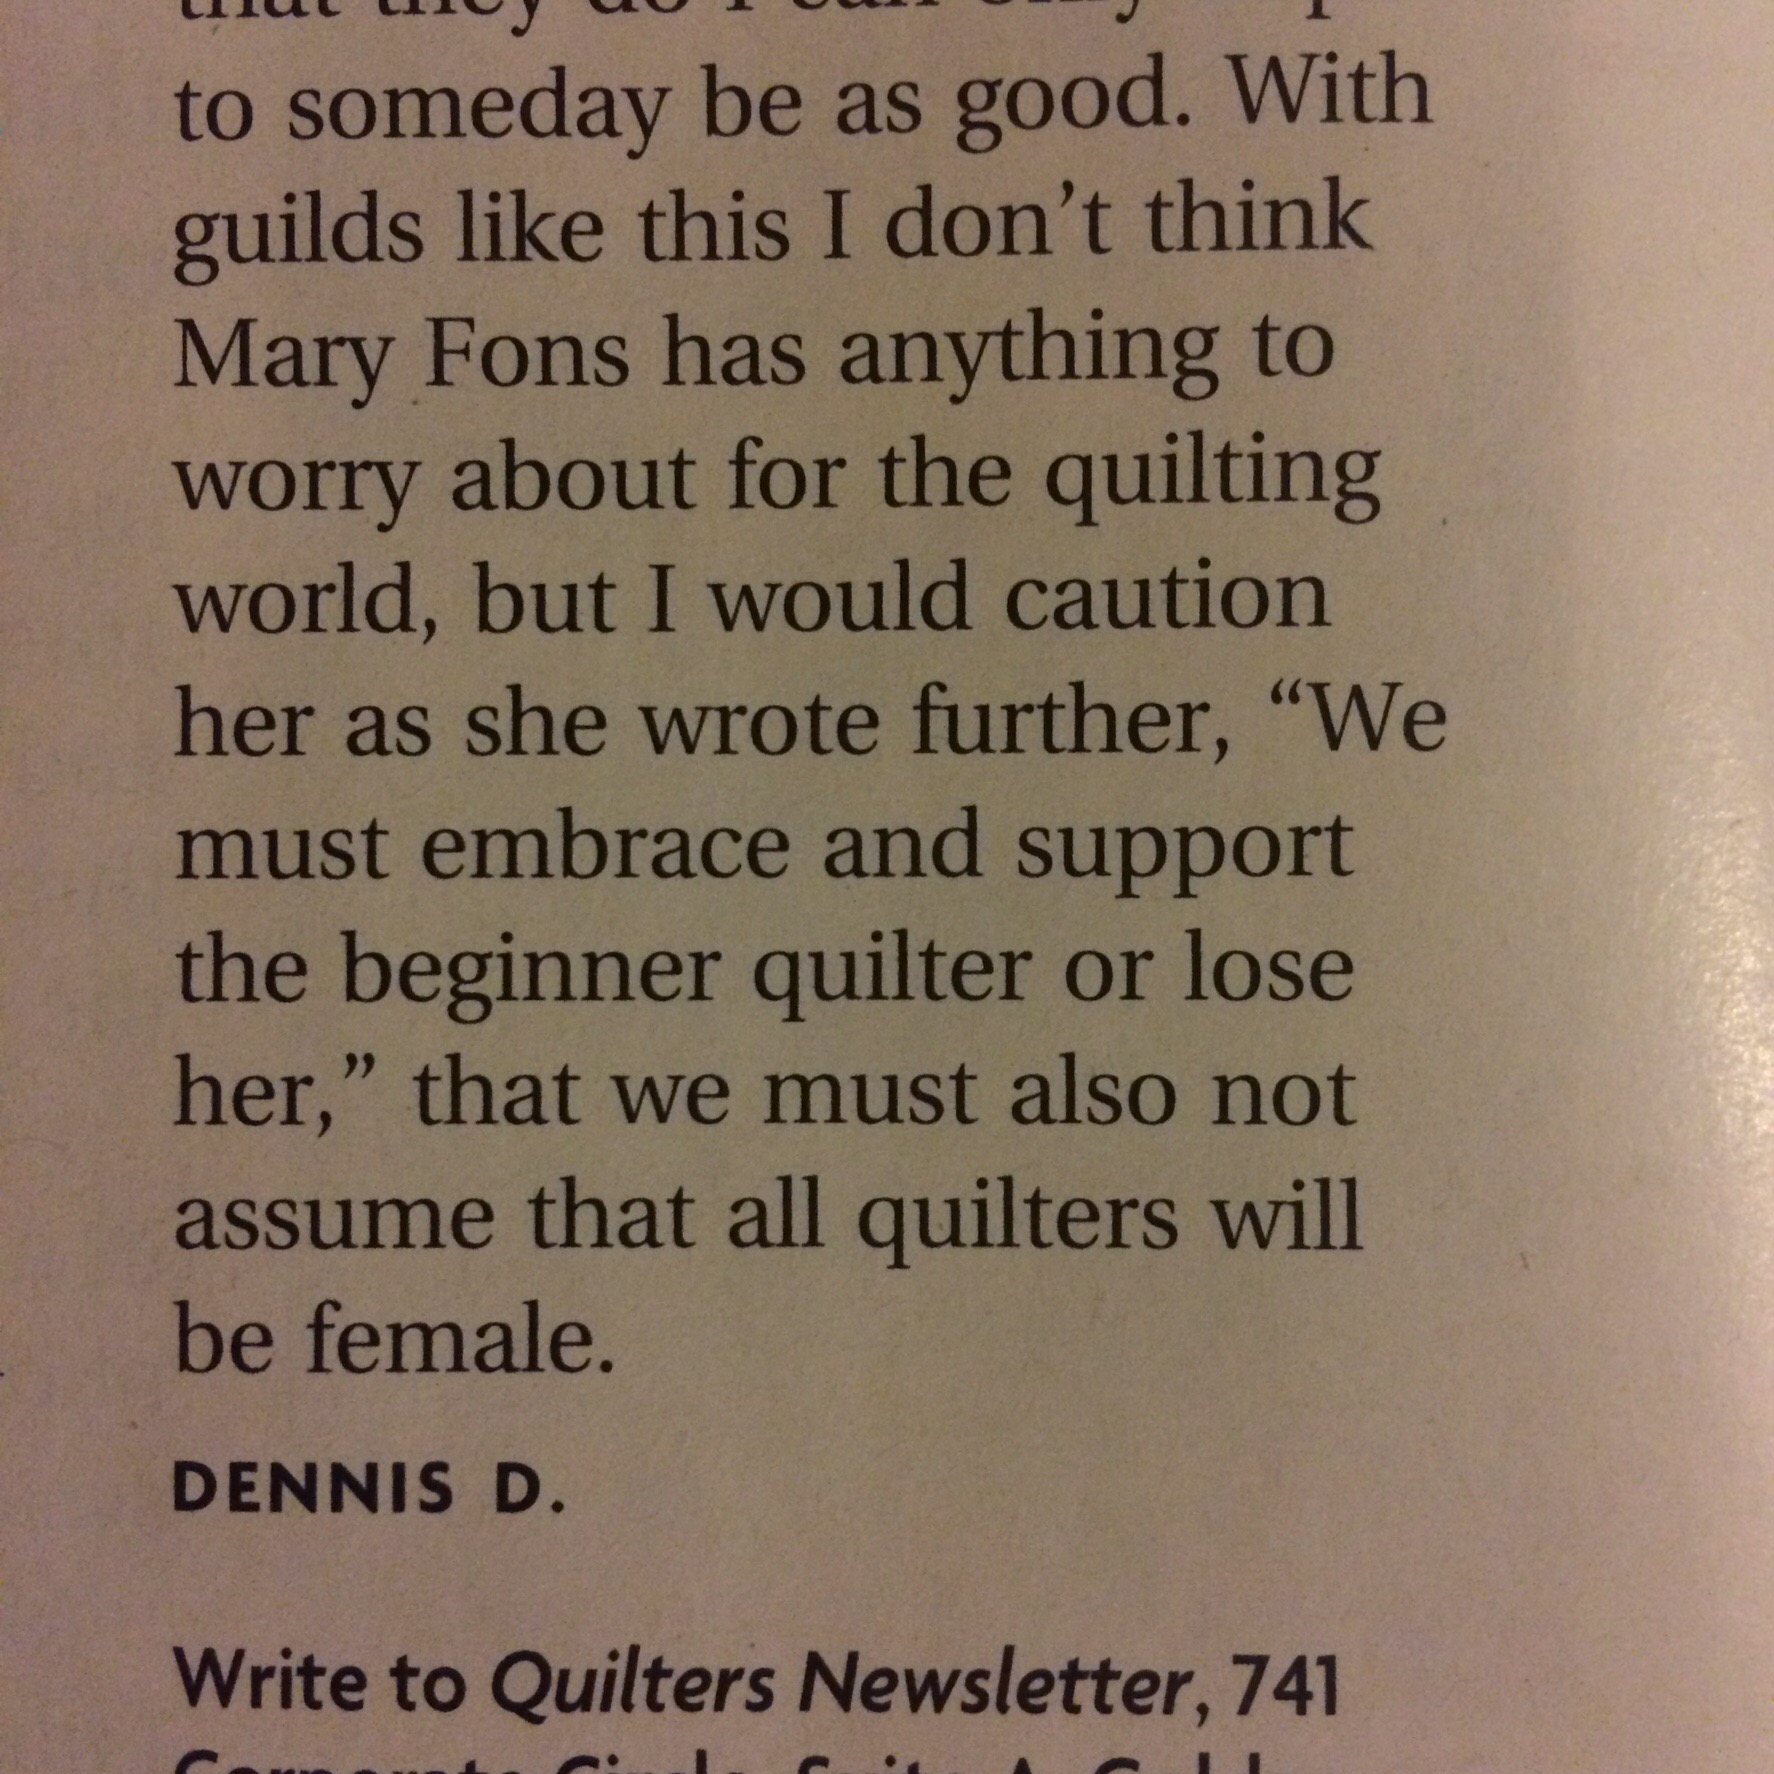
Everyone shed a tear for Dennis. Hear the tune of the world’s smallest violin.

Poor Dennis has had to deal with the world not catering to “him” as a default. So so sad.

Because of course it was women who callously shut out men from quilting. Certainly not men who shame other men for not being manly enough. Or denigrate anything traditionally feminine as merely a domestic craft, unworthy of artistic merit.

Clearly a despicable case of reverse sexism.

Thank you Dennis for fighting this insidious maltreatment.

(Standard #NotAllMen caveat: the male quilters I’ve had the pleasure of interacting with have been lovely, progressive people who wouldn’t make such asinine complaints.)

Are Quilters Too Nice?
August 5, 2015
Over and over again, I’ve heard or read about the “kindness of quilters” from other quilters. While quilters are certainly kind as a group, often going out of our way to help out or support other quilters, are we too nice?
I’m talking about the sometimes saccharine sweet reaction when you show off a new quilt. “It’s lovely!” “Wonderful.” “Well done.” et al, repeat as necessary.
As great as it is to hear that about your quilt, does it really help you to improve as a quilter?
Honest and helpful constructive feedback
Many of us quilt in a vacuum. We sew alone. The quilt may be seen by a family member or the person who is receiving it, but they often don’t know enough to be able to give informed feedback.
Those of us who belong to a quilt guild may have the opportunity to show our quilts to other quilters, but I’ve found that unless you ask for specific feedback, people are reluctant to give critical feedback (and for good reason! It’s a minefield.)
Ask for feedback
I’ve found that asking for honest, helpful feedback can really boost my quiltmaking. Often it re-enforces something that I’ve noticed myself. It gives me something to stride for when making my next quilt. Never underestimate the power of lessons learned.
It can be difficult to communicate what I’m looking for; often I find asking other people how they would do something is a good method. “What kind of border would you put on this quilt?” “How would you quilt this?”
Or asking for feedback on an idea. “I’m thinking about doing orange and blue, what do you think?”
For after a quilt is completed, ask what someone might do differently, or if they think a certain component works. If there was a problem or issue with the quilt, I ask about how they would overcome it if they had the problem.
And don’t forget – there is no obligation to take or use the feedback received. Consider it and move on.
Entering and attending quilt shows
Quilt shows are an excellent opportunity to get a critical review of your quilt. Some quilt shows (not all) will give you feedback from the judges. All the feedback I’ve ever received has always been honest and helpful, and gave me places to be sure I improved in the future.
One thing I’ve found over the years is that I love going to quilt shows with a partner. They can be quilters themselves, or at least interested in quilting. I like to discuss what I see with my partner. I’ll take a look at a quilt and try to figure out what I like or dislike about it. Is it subjective or objective? If it’s not my style or preference, is there something the quilt maker has done well? Is there something that could be improved upon technically? Would I have done something different?
I try to imagine that if the quilter overheard me discussing her quilt, she would feel that I’m trying to make an honest assessment. Just talking about it helps me to remember to apply what I’ve learned and what I’ve seen to my own quilts.
Pick your moment
Now obviously, in many public places (virtual or real life) it’s best if you have nothing nice to say to not say anything at all.
I’ll never forget when my Star of India quilt was on display at the Royal Canberra Show (like a state fair, for my fellow Americans). I won first prize for contemporary quilts, which was a wonderful surprise. I put a lot of work into this quilt and was pretty darn chuffed. When I got to the show to see it, I took a picture to post on social media and was hanging around, when a woman with a pram and her friend approached. The woman pointed at my quilt and said “Oh my god, it’s awful! I can’t believe that won.” I will admit I did a bit of a double take. Now, I typically will not hesitate to jump in and stand up for myself, but homegirl looked like she would throw down, so I demurred. But I’ll never forget it. (For the record, I am aware that my quilt is incredible and I’m proud of the job I’ve done.)
A large public Facebook group is probably not the place to start making unrequested feedback either. It’s amazing how quickly that can turn into a total shitshow.
There are a multitude of articles on Google for how to give constructive feedback, and it’s worth taking a look before wading in.
You can be constructive without being a Mean Girl.
In conclusion…
In the right place, at the right time, with the right people requesting honest constructive feedback, it’s probably more helpful to offer suggestions than just to say “Wow!”
How I Learned to Stop Worrying and Use Invisible Thread
August 5, 2015
Hi My Name is Coral and I’m Addicted to Invisible Thread
I saw those cool girls Harriet Hargrave and Diane Gaudynski using it, and they peer pressured me into trying it. It was a bit harder to use than regular thread, but the thrill was amazing so I kept on trying. In those early days of FMQ, it covered up my shame and difficulty, leaving only track marks. That was a gateway to trying harder techniques like invisible machine appliqué and using it to stitch in the ditch. Then things got dark; I had to buy the smoke colour too. I’ve even used it while making baby quilts. No babies have died yet, but I’m sure it’s only a matter of time. I’m still on my first two spools, but I know one day I’ll have to go back to my dealer at the quilt shop and shamefully ask for more.
I have seen some crazy shit when it comes to rumours about the evils of invisible thread.
It will ruin your sewing machine! It will ruin your quilt! It will turn brown! It will choke your child! I won’t even have it in my house! The horror!!!

Whatever.
I have never seen any evidence that any of this is true. Maybe it was based on some semblance of an actual occurrence at some point, but by now it’s been twisted into quilting myth.
OG machine quilters Harriet Hargrave and Diane Gaudynski have used it for decades.
Invisible thread is a tool like anything else; used in the correct way it performs its job beautifully and can enhance your quilt. It takes a little more TLC than cotton thread, but it’s totally do-able.
Here are my tips for using invisible thread.
Buy high quality invisible thread.
Like any other thread, don’t buy the cheap shit. It should come from a name brand and feel fine like hair not like fishing line.
I use YLI brand. Harriet Hargrave recommends Sew Art brand.
I use nylon thread. Some quilters prefer a polyester based invisible thread as it’s said to hold up to high heat better. I haven’t tried it, but on a low iron and being careful, I’ve never had any issue with the nylon based thread melting.
High quality thread won’t go brown or brittle like invisible thread in the 1970s or 80s may have done.
Also, like the myth about using only cotton thread in quilts as polyester can “cut” threads in the fabric, you don’t need to worry about this with a high quality modern invisible thread.
Start off with a spool of clear colour. This will suit 90% of uses. If you are planning on quilting on a very dark fabric, smoke colour may be a better choice, but often you can get away with clear.
Adjust your tension.
You’ll probably find you need to reduce your top tension setting slightly to achieve a nice tension with invisible thread.
Make yourself a practice piece to check your tension before working on your project.
Use a smaller needle.
Invisible thread is very thin. You should use a smaller needle. I prefer a size 60/8 sharp/microtex needle when using invisible thread, but will sometimes go up to a size 70/10 when free motion quilting for a bit more strength to deal with the needle flex.
If you have an automatic threader you may need to do it by hand as the eye of the needle is so small. Pro tip – if you have trouble seeing the thread, colour in the tip with a black permanent marker. Once threaded, you can cut this bit off, but it usually will end up discarded anyway at the start of your stitching.
Use regular thread in your bobbin.
Use a 50wt cotton, poly or specialist bobbin thread. You can chose something that matches your backing, or something light in case your tension is off and it shows through to the top – you can colour it in with a marker matching the fabric to camouflage it.
Some quilters have had success in using invisible thread in their bobbin, but I prefer to reduce complexity and avoid further risk of difficulty.
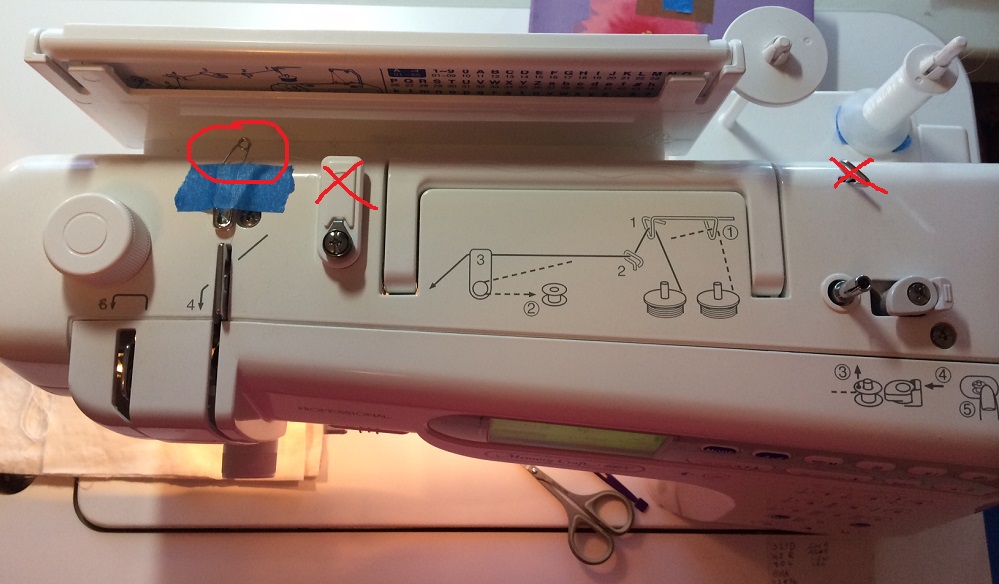
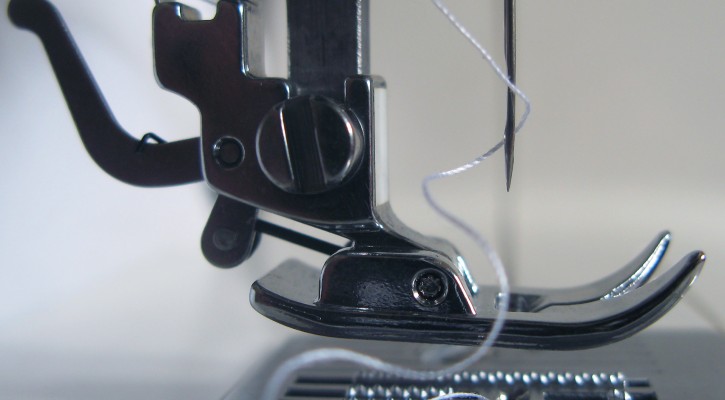
Beware your thread path.
You may find the invisible thread gets easily tangled in part of the thread path as it goes through the top of your sewing machine. If this happens, you can use a safety pin and some tape to modify your thread path to avoid the problem step.
I’ve done this on my machine:
 If you find your invisible thread keeps getting tangled on the bottom of your work or in the bobbin area, you may have a burr on your bobbin case. Think of it like a hangnail getting caught on panty hose – a teeny tiny piece of metal or plastic is catching on your thread. It probably isn’t a problem with cotton or polyester thread, because they’re too big to catch, but it is for invisible thread.
You can try getting your sewing machine mechanic to file down the edges of your bobbin case, but it’s often cheaper and easier to just buy a new bobbin case. Talk to your local dealer for your machine. Some people even use a separate bobbin case for invisible or fine silk thread only to keep it from getting worn out with regular sewing.
When I use invisible thread
Stitch in the Ditch
Invisible thread is by far my preferred method for this task. Stitching in the ditch is hard. All it takes is a slight wobble, and you’re out of the ditch. Invisible thread makes these mistakes, well, almost invisible.
Using a size 60/8 needle, you can get really really close to the edge of your ditch; the needle should be rubbing on the edge of the top fabric.
Free Motion Quilting
Invisible thread is a great choice for doing free motion quilting in areas where you don’t want to add colour – just texture. It is also superb if you are going over lots of different colours of fabric or pattern. I use it judiciously. I wouldn’t recommend it for doing an all over pattern, but it’s great in particular areas.
I used invisible thread to quilt along the pattern of the fabric in the fussy cut border of my Star of India quilt. It looks great – the texture emphasizes the design and I didn’t have to worry about accidentally getting black thread over the gold areas.
It’s also perfect for stitching closely around the edge of appliqués. The thread makes the appliquéd area pop, but you don’t have to worry about accidentally going up on your appliqué with a highly visible thread.
But maybe not for beginner free motion quilters…
Invisible thread is often recommended for practice use by beginner free motion quilters since mistakes are almost invisible. However, I wouldn’t recommend it. The reason is with invisible thread, you can’t see the size of your stitches. It difficult to try and maintain even a semi-consistent stitch length if you can’t actually see the individual stitches. Practice with a light colour thread on a dark solid fabric instead.
But if you want to take a something like a pre-printed panel, sandwich it and go nuts free motion quilting with invisible thread to give it go, why not!
Invisible Machine Appliqué
Invisible thread is great for using on turned edge appliqué. I use a small zig zag – 1.5 stitch length and width. A blind hem stitch is another good option.
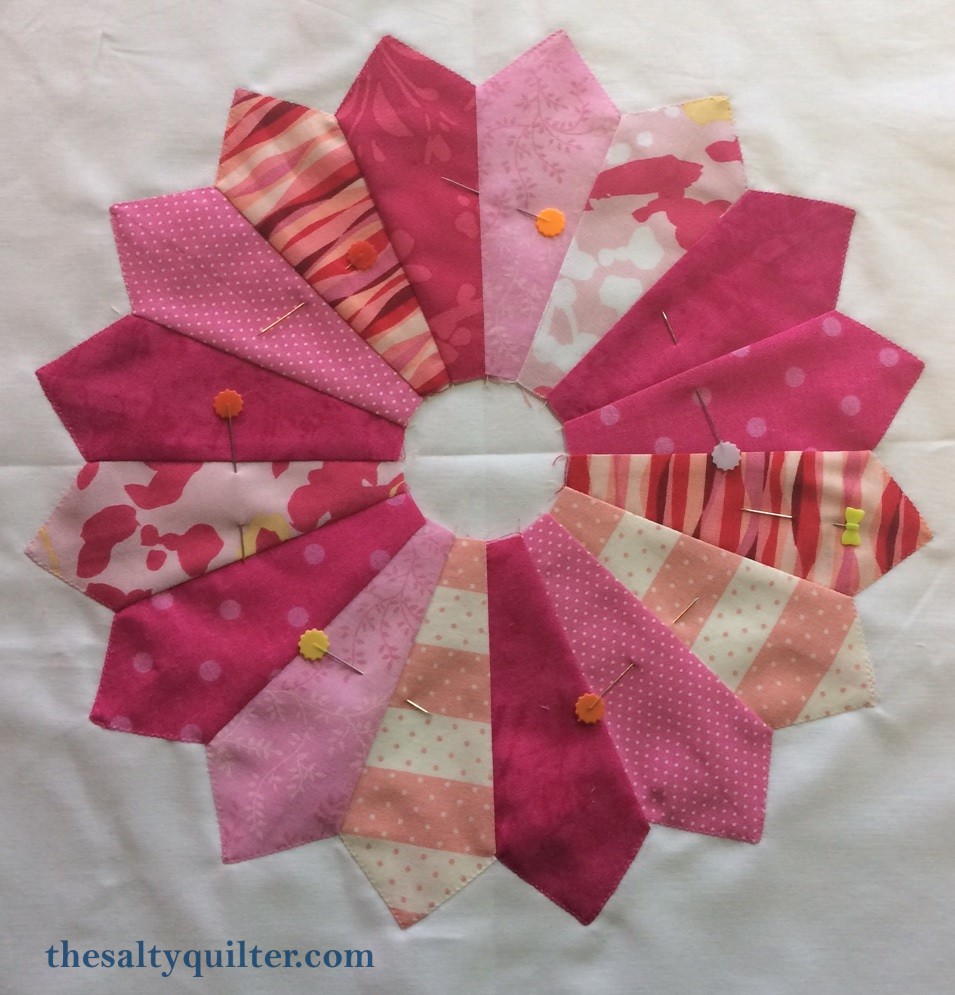
Generations quilt patterns has a good tutorial doing this type of machine appliqué. I also used it for appliquéing down a Dresden Plate.
In Conclusion…
I hope you’ll give invisible thread a try. It’s a very useful tool for your quilting skills repository.
Seven Standard Steps For Sewing Machine Troubleshooting
August 5, 2015
I’m a member of several wonderful Facebook groups for quilters and sewists/sewers, whatever buzzword you want to use. Almost every day I see a post from someone asking for help for a misbehaving sewing machine. Unless they mention it, I never know what they’ve actually tried – so what I suggest may not be applicable.
Like all machines, there are standard troubleshooting steps you can take to resolve issues.
I wanted a reference so I could ask: “have you tried the standard steps?” so I decided to create one.

Step 1: Is your foot down?
I know, this is ridiculous, but how many times have you started sewing, only to realise you didn’t put your foot wasn’t down and now you have a birds nest on the back? Many computerised machines will give you a beep to remind you, thank the sewing gods.
Step 2: Re-thread the machine – top and bottom.
Just do it, seriously. It’s one of those things. The bobbin thread didn’t get put in perfectly. The top thread is slightly off in the tension disks. Do it.
And don’t forget to check the bobbin itself. Is it feeding in the right direction? Is it wound nicely?
Step 3: Check your tension dial.
Did your tension dial get knocked out of its regular setting? Were you doing another stitch like a zig zag and forgot to change the tension back?
Step 4: Change your needle.
You know how to change your needle right? You aren’t using the one that originally came with your machine?
Many manufacturers recommend changing your need after eight hours of sewing. Who keeps track? I will usually change before starting a new piecing project or quilting – but this can vary based on the size of your project. When the needle is making a “thwack thwack thwack” noise, it’s time.
Sometimes needles get bent or tweaked and you may not be able to see it. Sometimes they’re bad straight out of the package. Change it and see.
You also need to be using the right type of needle and size. SewMamaSew has a nice guide to the various types and sizes of needles. Changing to a larger needle can often resolve skipped stitches. Changing to a different type can better accommodate different types of thread or fabric.
My personal favourite is a Schmetz size 80/12 sharp/microtex for both piecing and quilting with 50 weight Gutterman/Rasant thread.
Step 5: Clean out the bobbin area and oil the machine if it’s been awhile.
Get out your manual. Figure out how to get your faceplate off (assuming a top loading bobbin) and remove the bobbin race. Give it a good clean with a small paintbrush, pipe cleaner, or cotton swab to get out the fuzz. If you have a mini vacuum attachment, use that. I’m not a fan of compressed air as I think it blows crap down into your machine, but you can give it a little blow with your mouth to loosen things up if necessary. Make sure you do this fairly regularly if you’re sewing a lot, particularly after working with anything fuzzy.
Have you oiled your machine lately? Like in the last six months? Give that a go. Check your manual for details and recommended frequency.
Step 6: Try changing out the fabric/thread/batting/interfacing/fusible to see if the issue remains.
Sewing machines can be quirky. Sometimes they just don’t like a particular medium they have to sew through. If you’re using something different than usual, swap it out to see if the issue resolves. If it does, can you use an alternative solution?
Go through in a scientific manner – change out one thing at a time to track down the offending material.
I tried and tried to get my Janome MC6600P to use The Bottom Line thread in the top of the machine. Every few inches it would throw a loop in the top. I tried everything – even the expensive Titanium needles recommended. Nope, it just didn’t like that thread (although it works fine in the bobbin).
Step 7: Turn your machine off, have a break and a beverage.
THIS STEP CAN BE PERFORMED AT ANY TIME!!! REPEAT AS NECESSARY!
Sometimes you and your machine need a break. When frustration is mounting, that’s the time. Come back to it later. The issue may resolve itself. Fingers crossed!
No good? Now what?
If you’ve done those steps and you still can’t figure out a resolution, that’s the time to ask for help. You also should probably consider a visit to your sewing machine mechanic or a general service if it’s overdue.
Don’t Apologise for Being a Beginner Quilter
August 5, 2015
I’ll often see or hear new quilters apologise for being beginners, both online and in real life.
STOP APOLOGISING!
You absolutely do not need to apologise for being a beginner. We were all beginners at some point. No one came out of the womb with a needle in her hand piecing hexagons.
We all at one point went “hey let’s try this quilting thing” and decided to go for it. Commend yourself for actually following through and trying it out!
I realise this is often a gendered thing, but you are in the family now, you don’t need to apologise for being an enthusiastic quilter.
I love beginner quilters for several reasons.
Firstly, they are some of the most out of the box creative quilters. They aren’t bounded in by the rules and traditions of quilting because they don’t know them! They aren’t afraid to try something new or different because they don’t know any better. They aren’t scared to tackle a challenging pattern because they don’t know that it’s considered tough.
Secondly, once you’ve caught the quilting bug, it’s a fever! You can’t get enough! It’s a compulsion. Maintaining this kind of enthusiasm is difficult over the long term; eventually your sewjo will slow down. Embrace this wonderful craving while you can.
Thirdly, they’re willing to try out new techniques. Beginner quilters are open to trying lots of new methods because they haven’t found their favourites. Read lots of blogs, watch lots of videos, check out different books and patterns, and please please please try some classes with different teachers – online and in person. You will learn so much more beyond the topic at hand.
There’s more than one way to skin a cat – try them all. The wonder of discovery is bliss.
Lastly, they aren’t afraid to ask questions. Asking questions opens you up to learning new ideas and techniques. That being said…
Google that shit first.
Often spending 30 seconds in Google can give you a variety of useful answers. It can be bothersome when beginners ask very easily answerable questions over and over.
Come with some research – “I found two different methods, which do people prefer? Quilter A recommends method B for basting, what do you use? Is there an easier way to do X technique? The pattern says to do this, and I looked it up, but I don’t quite understand what they mean.”
A little bit of due diligence can help you to get a deeper, more useful response to questions.
Congratulations on being a beginning quilter!
You only get this time once, enjoy it.
Experienced quilters, let’s try to recapture some of that magic by helping beginners on their way.
A Song of Ice and Fire
August 4, 2015
The Bad Ass Quilters Society is hosting a Game of Thrones quilt challenge. We Aussies were fortunate enough to get a local supply via Professional Quilting Services.

The quilts must be made completely with the fabric provided (including binding) and can only be 18 inches square.
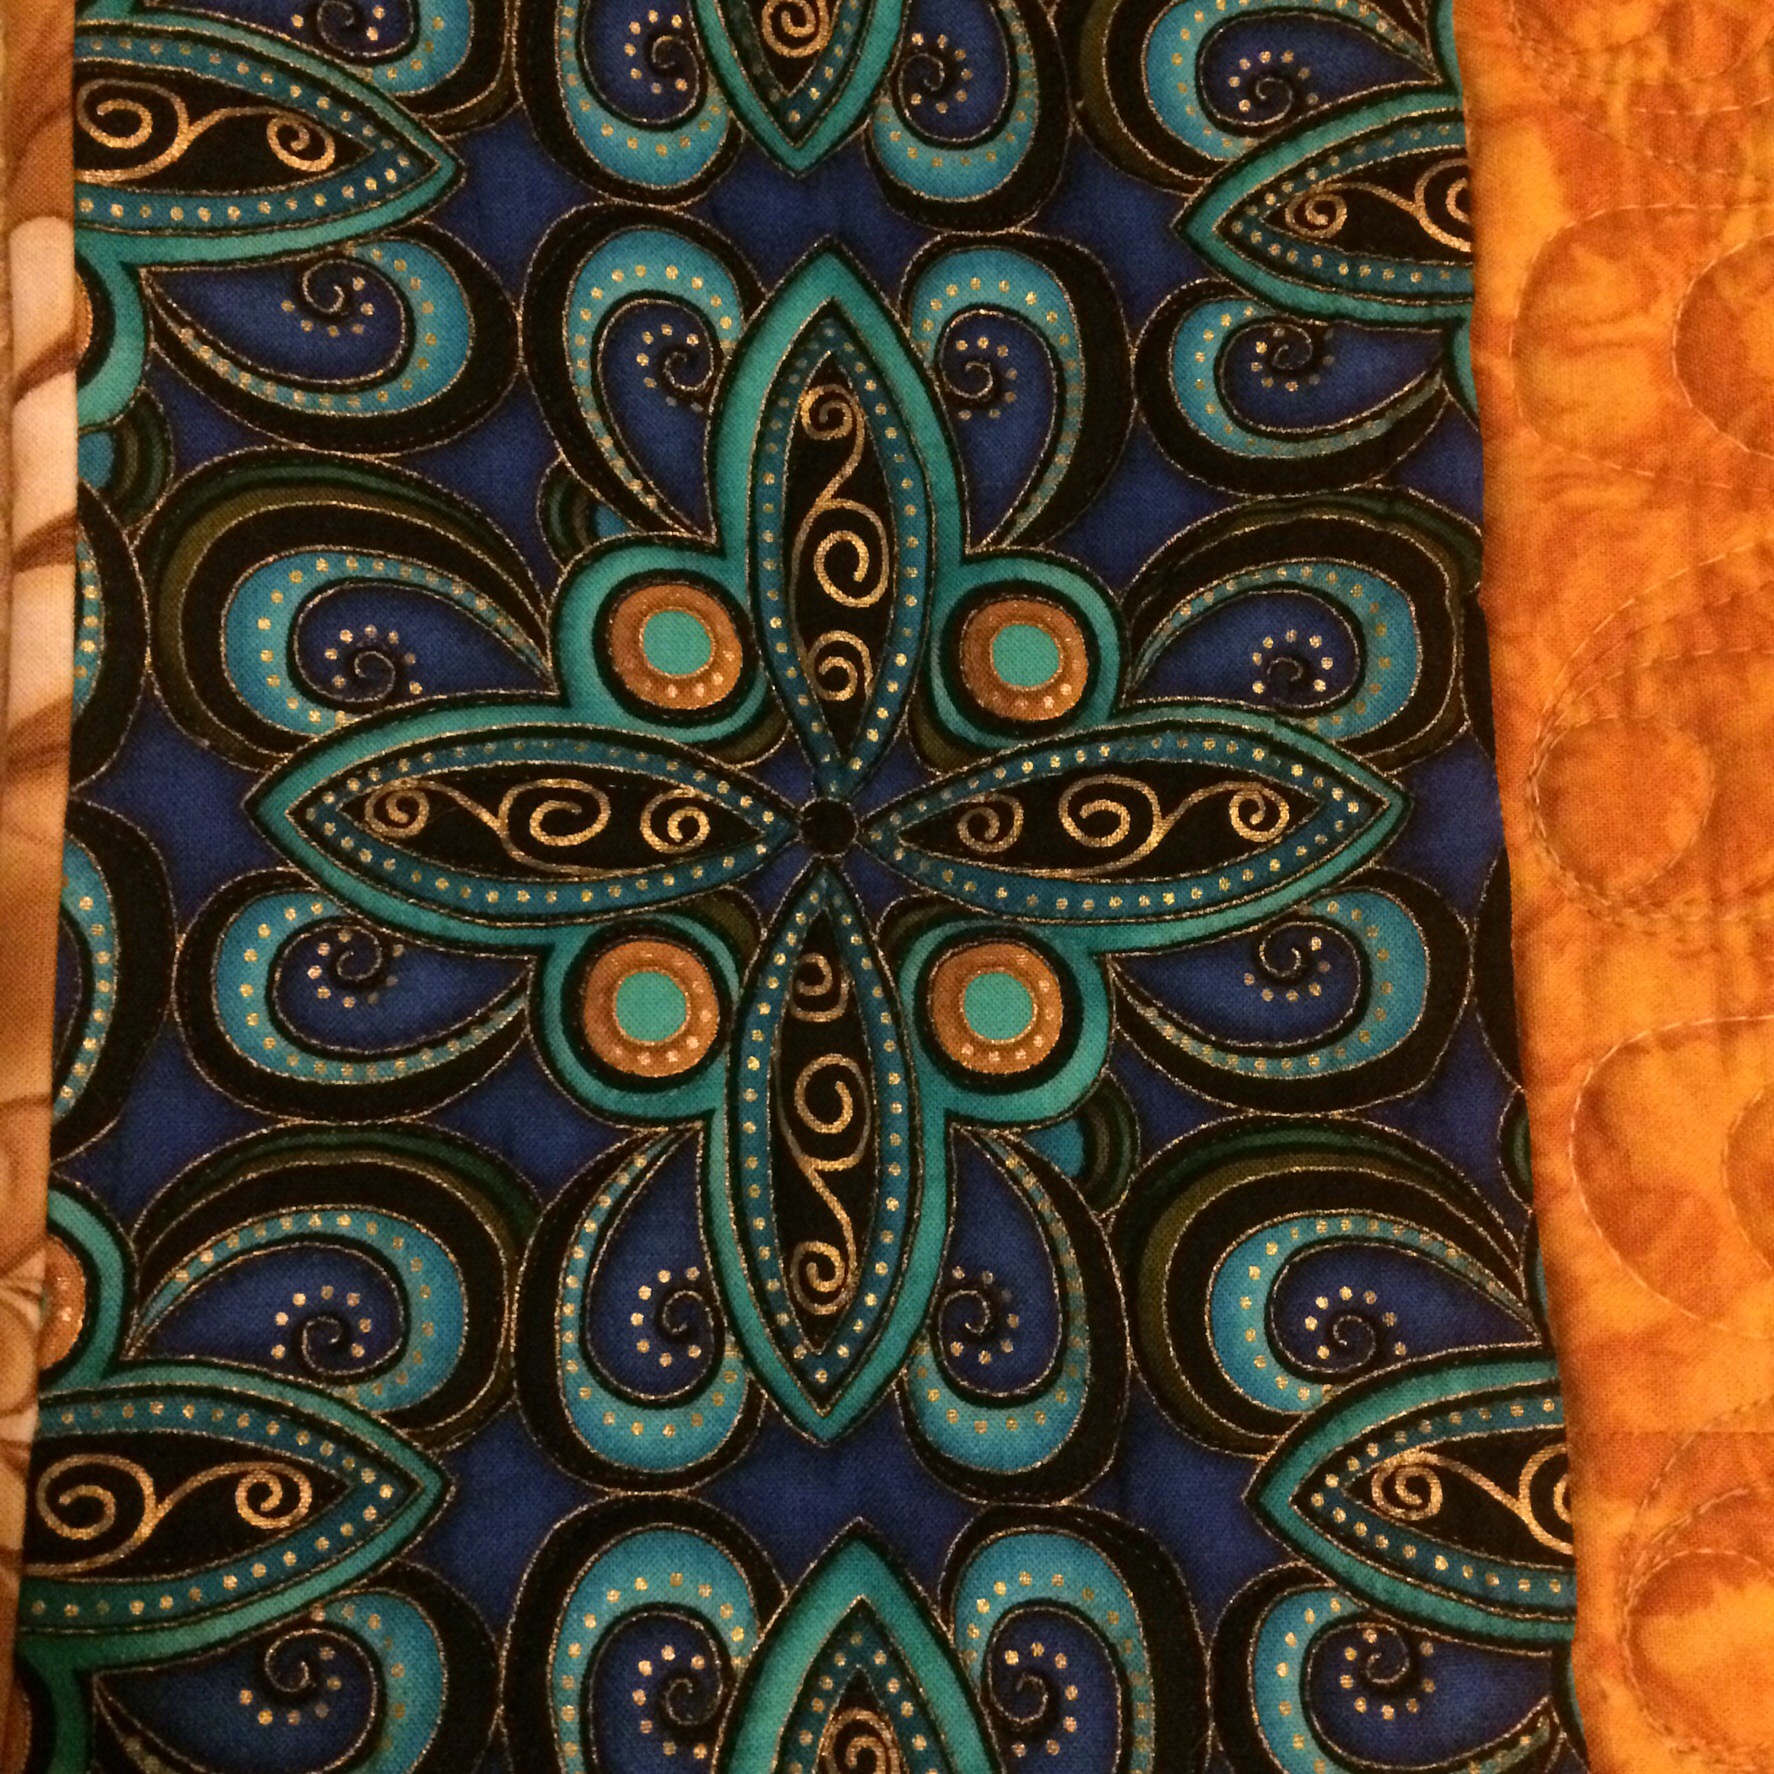
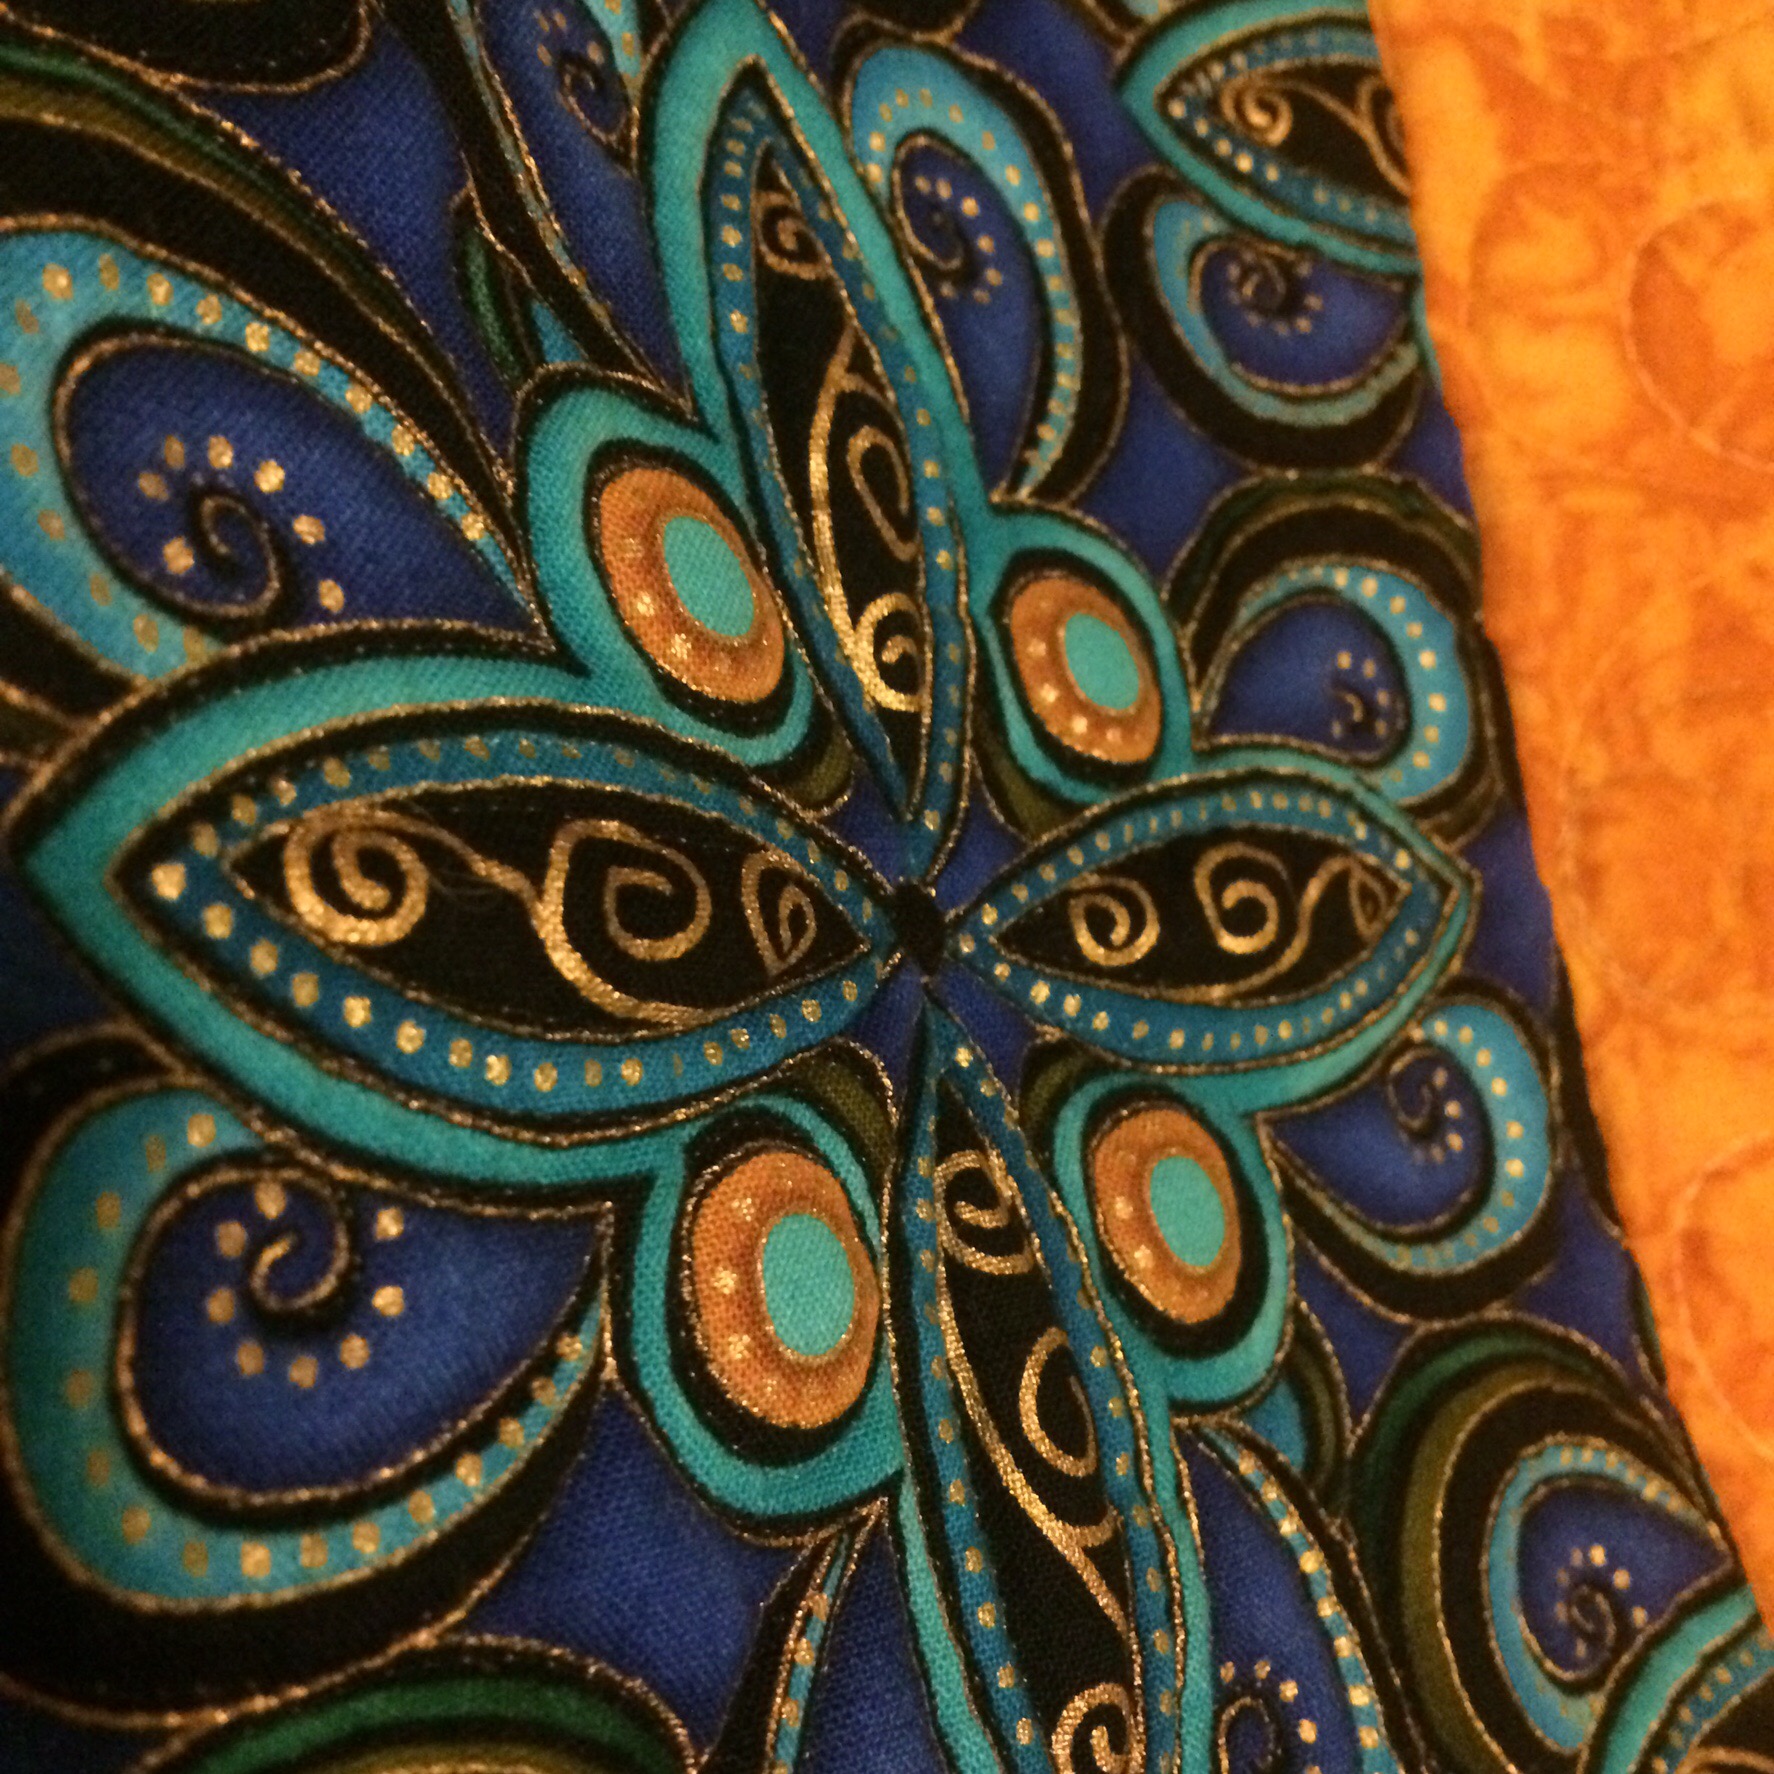
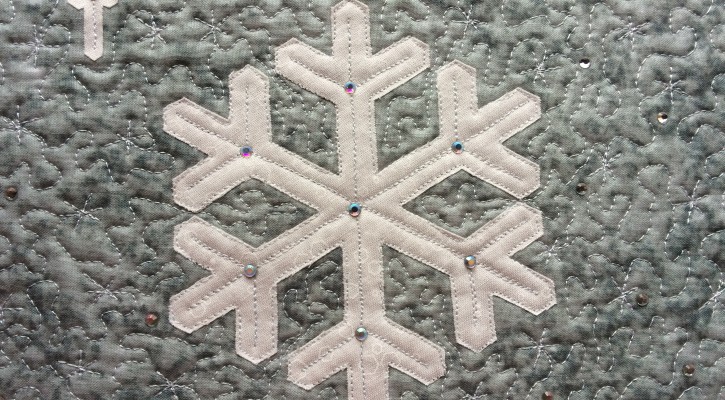
I bought both colourways and have finished my first quilt – A Song of Ice and Fire – using the Blood, Stone, Steel and Fire colourway.
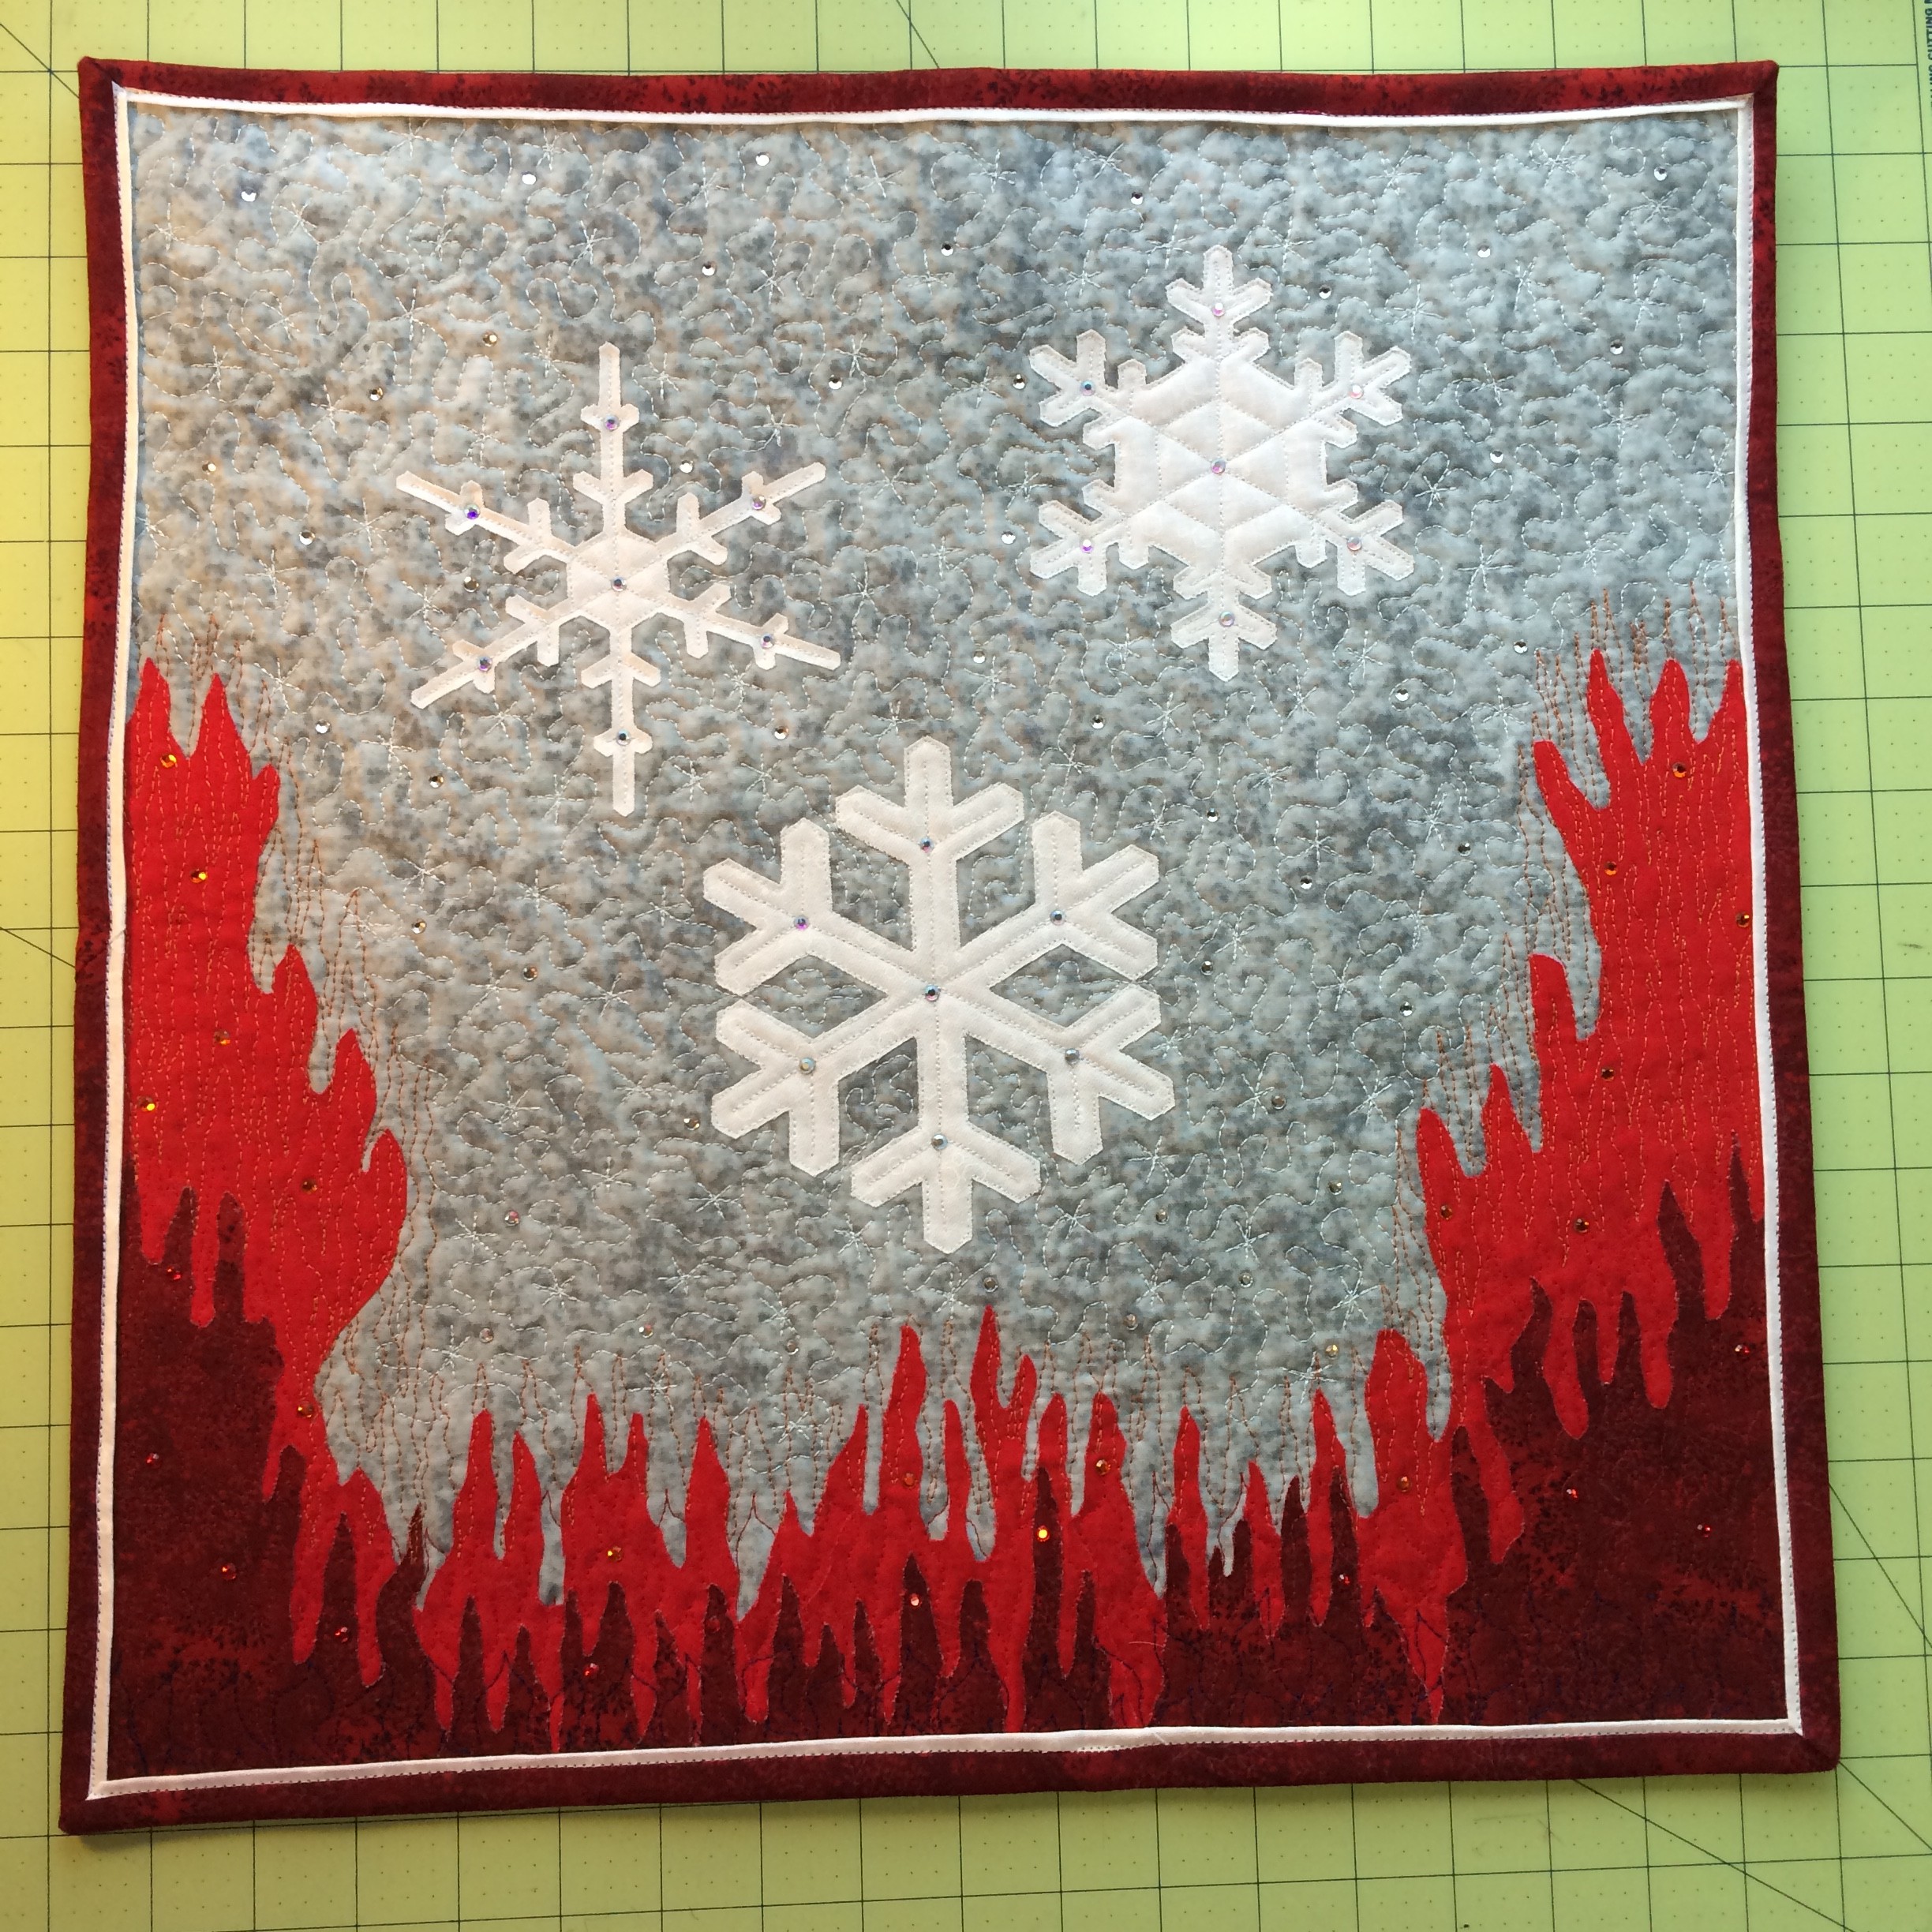

My inspiration was of course the name of George RR Martin’s book saga. The three snowflakes represent the prophesied three heads of the dragon.
My friend Jennifer was kind enough to loan me her “glitteriser” to add some sparkle with hot fix crystals.

I used Sew Fresh Quilts flanged quilt binding tutorial. I will need some more practice with this technique, but I’m happy with the overall effect.
I’ll be sending my quilt to the USA for display at AQS Chattanooga in September 2015. There will also be online voting.
Now I have to figure out what do with the other fabric pack.
Broken Star
July 7, 2015
General Info
| Start Date | 7 July, 2015 |
|---|---|
| Finish Date | 22 July, 2015 |
| Status | Completed |
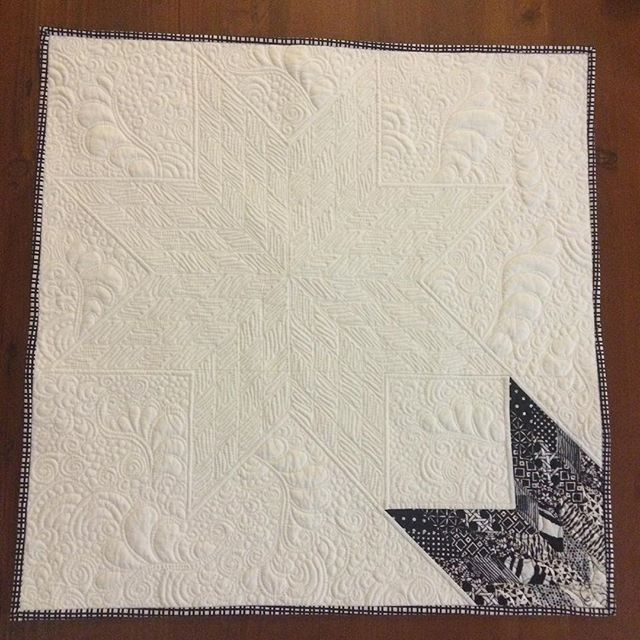
| Size | 24 1/2″ square |
| Pattern | My Own Design |
| What it’s for | Canberra Modern Quilt Guild Modern Takes on Traditional Challenge for the Canberra Quilt and Craft Fair 2015 |
| Batting | Two layers bleached cotton. |
Quilt Top Notes/Techniques
The Canberra Modern Quilt Guild sponsored a challenge for our display at the Canberra Craft and Quilt Fair in August 2015. The theme was a monochrome (black, white and gray) “Modern Traditional” mini quilt 24″ square. I used QuiltSmart’s Little Lone Star fusible interfacing to make scrappy gradient lone star blades.
Quilting Notes/Techniques
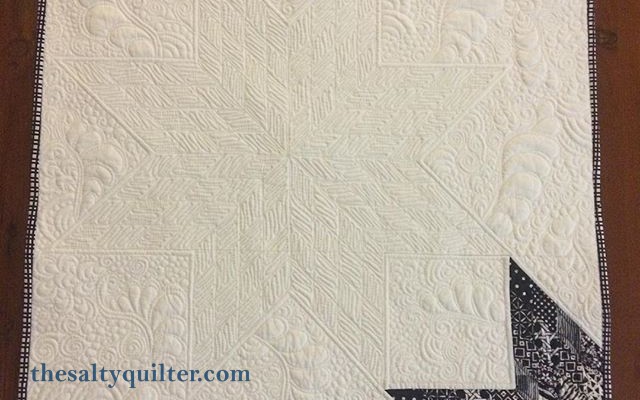
I drew a full star out using the Clover water erasable pen. I used two layers of bleached cotton batting. The basket weave fill is based on Margaret Solomon Gunn’s grid based fills article in Machine Quilting Unlimited July 2015.
White/black Gutterman 50 wt cotton thread and dove gray Rasant cotton poly thread for basket weave fill.
Progress Pictures

Interfacing used to make the star blade.

Finished star blade.

Broken Star block.

Broken Star Quilt Top

Straight line quilting done on star.

Basket weave fill in star.

White background filler quilting.

Quilting done before blocking.
Fuck the Patriarchy
June 5, 2015
General Info
| Start Date | Jan 14, 2015 |
|---|---|
| Finish Date | Jun 5, 2015 |
| Status | Finished |
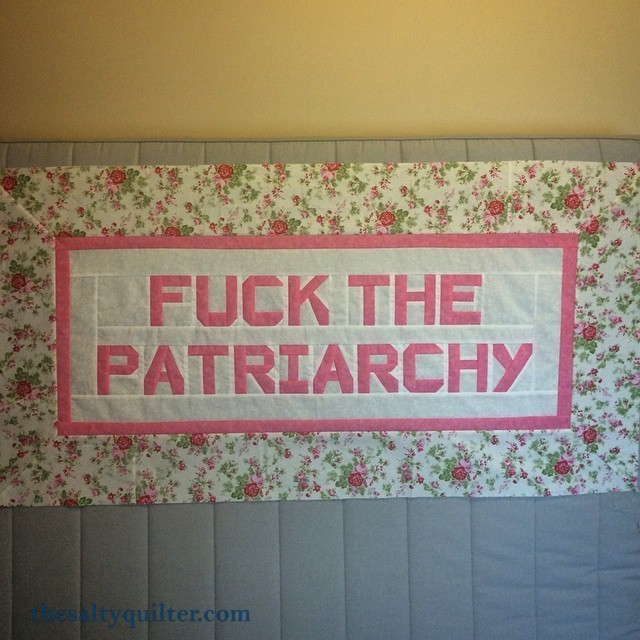
| Size | Approx 63″ x 25″ |
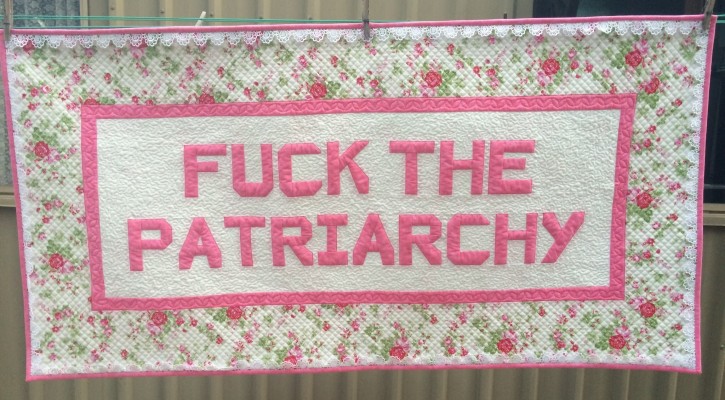
| Pattern | My own design. Paper-pieced letters from Quilt Talk by Sam Hunter. |
| What it’s for | Originally made for a social commentary fabric exhibition organised by Bee & Lotus Textiles. Exhibition date/location TBA. |
| Batting | 2 layers bleached cotton batting |
For a long time, I’ve thought about feminism in quilting today (as one does). Although a traditionally feminine domestic craft like quilting would likely to seem to be un-feminist, or even anti-feminist, to many outsiders, I have come to the conclusion it is actually a seriously feminist statement. In today’s day and age, women are expected to “have it all” and be everything to everyone else, but what they don’t get is any time to themselves. While quilting produces a product that may be given to someone out of love or caring, the process of quilting itself actually allows women to take time for themselves. Crafts have been shown to be extremely therapeutic, and when a woman decides that she is going to do one of these crafts it’s saying “My wants, needs and what I like to do are important too”.
As part of this dialogue I’ve been having with myself, I was inspired by the popular subversive cross stitch patterns, which use traditional counted cross stitch for extremely nontraditional sayings or text. I thought about making a super feminine traditional style wall hanging, with a modern feminist statement.
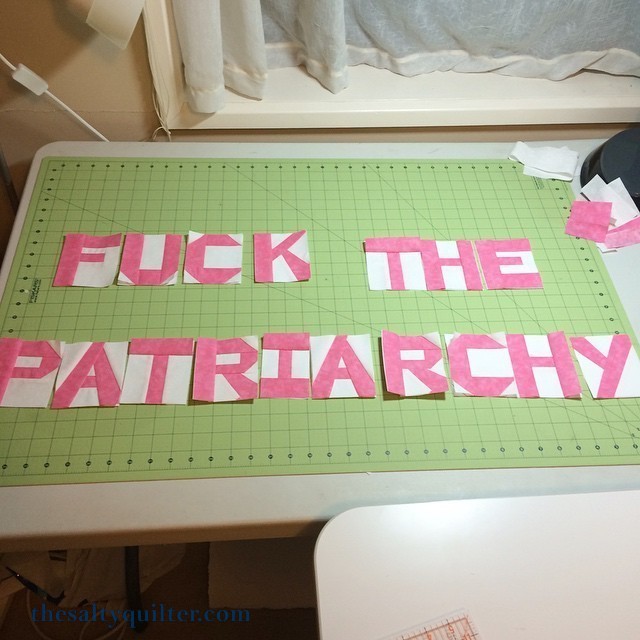
Towards the end of last year, there was much more attention in the media of women being killed or harmed by their partners. After hearing about several high profile incidents in both the USA and Australia, I found out that quilter and pattern maker Pam Bono had been killed by her husband in a murder/suicide. He even killed her beloved bulldog. At this point, I was outraged. The only thing I could think was “FUCK THE PATRIARCHY”.
This quilt is the synthesis of my anger over the fact that one woman a week in Australia and three women a DAY in the USA are killed by their partners or former partners. All proceeds from the potential sale of this quilt at the exhibition will be donated to a local women’s shelter.
Quilt Top Notes/Techniques
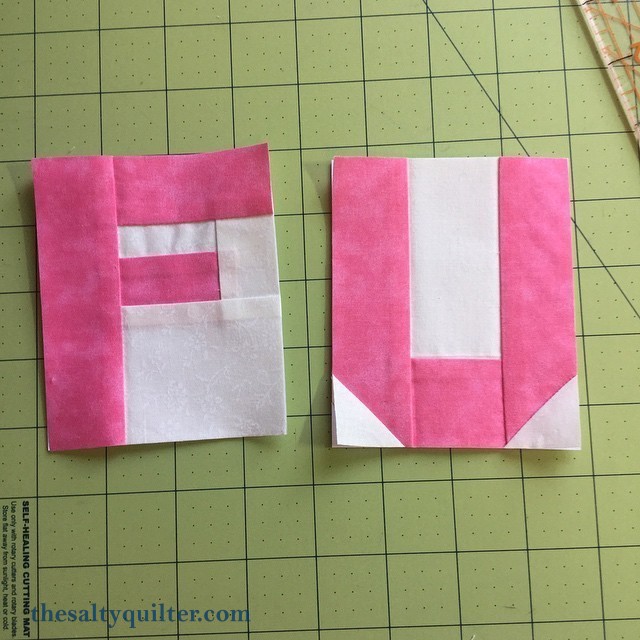
Foundation paper pieced letters.
Quilting Notes/Techniques
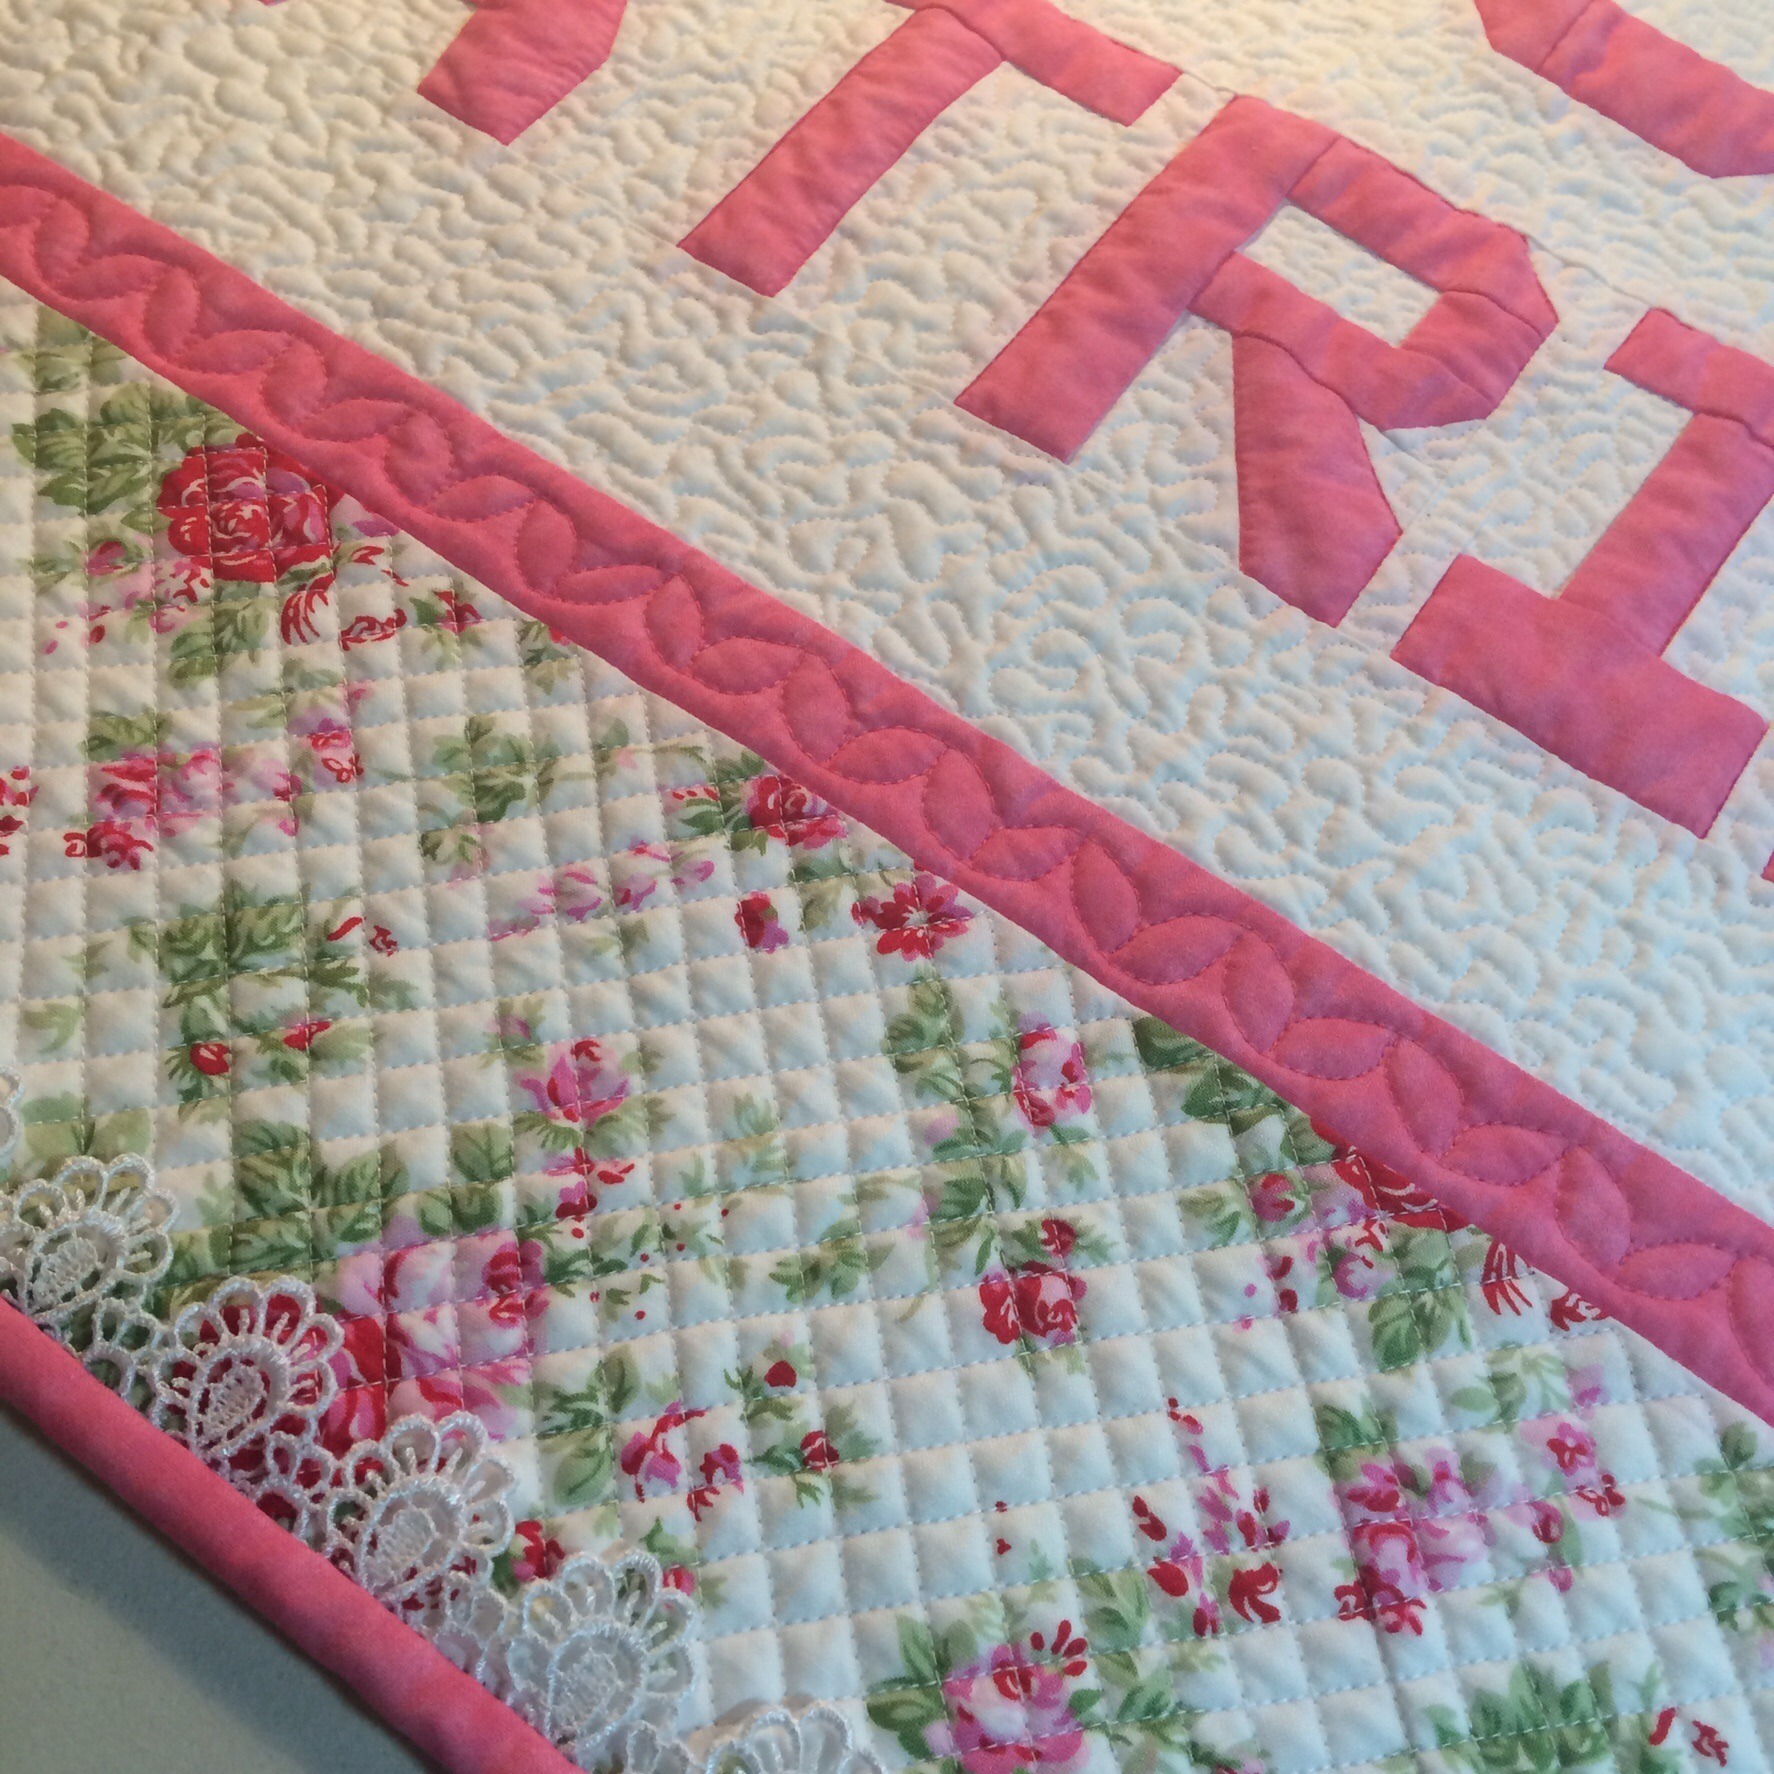
I wanted to use very traditional quilting to emphasize the traditional style of the quilt. I stippled the white background and stitched in the ditch of the letters with invisible thread. I marked out a pumpkin seed design for the inner border and marked a 1/2″ on point grid for the outer border.
I had originally planned to put the lace on the seam between the inner and outer border, pointing out. But as I finished my quilting, I decided to incorporate it into the binding instead. I free motion quilted over the edges of the lace on the sides and bottom to stop it from drooping.
Progress Pictures